Securing a GraphQL Server API with ASP.NET Core & Azure AD B2C - Part 4
Automating Build & Deployment to Azure App Service
The Setup
In Part 1 of this blog series, I covered the process of standing up an API using GraphQL, GraphiQL and ASP.NET Core. Part 2 covered the process of setting up a new Azure AD B2C tenant and configuring it for user authentication. Part 3 introduced authentication and authorization of the GraphiQL application. Now that those pieces are in place, I'll show how to prepare an Azure hosting environment for your API and automate deployment into that environment. Future post(s) will discuss how to add a custom React client application to the mix for a fully custom experience.
The series assumes that you know basic GraphQL concepts, and does not cover building queries, mutations, etc except as they relate to or are effected by the particulars of the security implementation. I also assume you know your way around the Azure Portal and Azure DevOps. All series code will be made available on GitHub. The code referenced in this post can be found in the 'part-4-bicep' branch. I'll be using Visual Studio Code throughout the series, feel free to use the tool of your choice to manage your code.
Part 4 - Automating Environment Configuration and Deployment
Modern applications and development processes often require non-trivial environment configuration. The API(s), client applications, databases and infrastructure involved often need to be configured for multiple deployment "stages" (think development, test, staging, production, etc.). Ensuring that these environments are configured in a secure, repeatable fashion is of utmost importance to minimize security and operational concerns. One way of managing this complexity is to use tools like Azure Bicep and Azure DevOps to securely automate your environment configuration and application deployments.
High Level Concepts
The following diagram shows how these two tools fit into the configuration and deployment story for the GraphQL API and GraphiQL front-end, as well as a yet-to-be-built React client application.
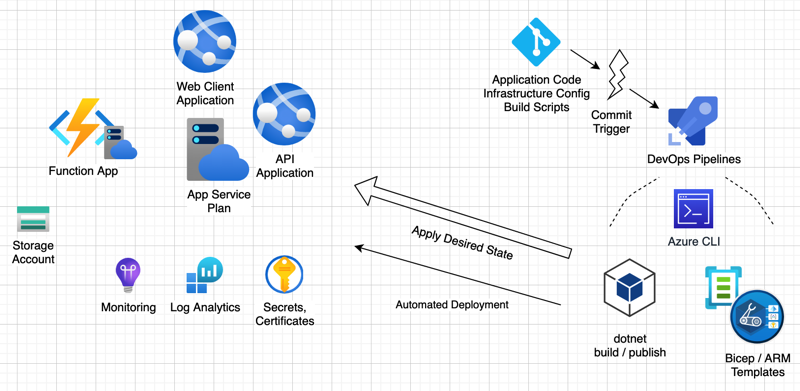 Azure Infrastructure
Azure Bicep provides a domain specific language (DSL) to express the desired state of the environment(s). These infrastructure-as-code files and accompanying utilities can be executed against your environments to ensure they match that desired state. If gaps are found, the resource manager (mostly) seamlessly updates your environment. Most of the Azure resources used in this series can be configured with Bicep files and parameter files, with the Azure CLI filling the gaps as necessary.
Infrastructure is, of course, only half of the equation. The application code and resources provide the actual functionality that clients use to access the system. Azure DevOps steps in to monitor the code repositories and provides build and deployment scripts (via YAML files) which can turn the raw application code into deployable modules in an automated fashion. Deployments can be managed across environments and differing configuration (secrets, endpoints, etc) can be applied to each environment to ensure isolation. Various gating/approval features can be applied to ensure that application downtime is minimized, isolate deployments to non-business critical times and require approvals from responsible parties prior to deploying to key environments.
Getting Started with Bicep
The first step to using Bicep is to install the tools that enable you to create and deploy your templates. The installation instructions can be found here, but they boil down to:
- Install the Bicep VS Code extension (see the link above)
- Install the Azure CLI -- instructions here
- Install bicep support into the Azure CLI
az bicep install
Once those steps are complete, your environment should be ready to go and you can create your Bicep templates.
Infrastructure Project Layout
If you are familiar with the 'Ansible' toolkit, then you will be familiar with the concept of a 'playbook'. For those who have never heard of Ansible, or have been away for a while, the 'playbook' defines the steps, inputs and outputs required to get an environment into a desired state. In Bicep terms, a template is a file which can be compiled and applied to an Azure environment by the Resource Manager to reach the desired end state.
I'm using a mix of Ansible and Bicep terms here because they provide a convenient way to think about your deployment. The 'playbook' template defines the deployment as a whole, while each role (and matching Bicep module file) supply a set of resource definitions to fulfill a particular function of the overall system. I strongly suggest taking the time to work through the Bicep specific training modules on Microsoft Learn to get details about Bicep templates/modules and how they work.
Aside: Ansible vs. Bicep
This blog post started as a walkthrough for using the Ansible toolset to get resources configured and deployed in an automated fashion. As a matter of fact, you can still find the requisite code in the 'part-4' branch on Github. I've used Ansible on a number of projects before, but on recent projects, I was not quite satisfied with the final solution. It worked, but there were too many 'rough edges' and too many manual steps to the Ansible solution.
As a result of those experiences, and after hearing about Bicep from a colleague of mine at THAT Conference, I decided to give Bicep a try. Bicep certainly has its own set of rough edges, and it's still in preview / active development. However, by hewing closer to the ARM template source that powers Azure deployments, I found that I could get better automation, with fewer tools and easier integration into tools like Azure DevOps Pipelines.
The Ansible solution was 'mostly done' (DevOps Pipelines integration hadn't been started). If you're using Ansible and are interested in going that route, feel free to reach out on Twitter/Email/comments/etc with questions and I'll try to answer them for you. In the end, Bicep proved better for my particular use case here, so that's what I'll walk through.
... and back on topic
Bicep itself is a DSL and cannot be directly consumed by the Azure Resource Manager. The Bicep DSL was created to help simplify and modularize ARM template creation (something like TypeScript -> JavaScript for web folks). All Bicep templates are compiled by the Azure CLI tooling into ARM templates, which can be used by the Resource Manager to coordinate the subsequent deployment(s). This compilation process happens automatically by the Azure CLI, so you mostly don't have to worry about it.
Our solution is headlined by the main 'playbook.bicep' file, which has five 'roles' that we need to apply:
- Base - Baseline cross-role resources
- API - The API itself (and GraphiQL front-end)
- Web App - A custom React web application consumer (future state)
- Function App - Backend 'service' functionality for the system (future state)
- Key Vault - stores secrets used by the various applications
The diagram below shows a visual representation of the playbook, with the referenced modules and the subsequent resources that are created.
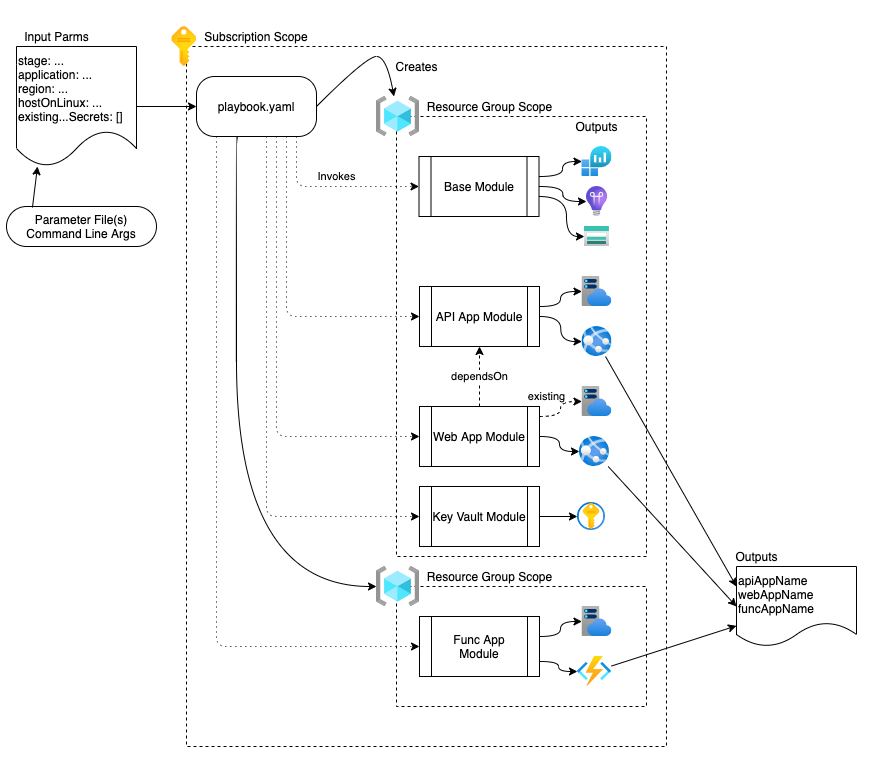 Bicep Playbook - Module and Resource Layout Visualization
This matching folder layout looks like this:
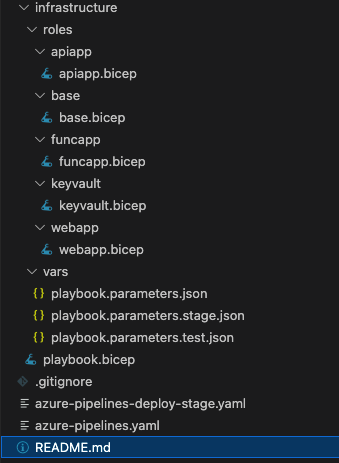 VS Code - Infrastructure - Code File Organization
The 'vars' directory contains a general parameters file and environment specific parameter files which are used by the DevOps pipelines to control the inputs to the Bicep templates/modules. The pipeline itself is located in the root of the repository (as azure-pipelines.yaml).
Creating the 'playbook' template
The playbook has three primary sections:
- Parameter Declarations
- Resource Configuration / Module References
- Output Declarations
Parameters represent the 'input' to the template/module. In our case, they look like this:
@description('The stage (or environment) that the resource is a part of')
@allowed([
  'dev'
  'test'
  'uat'
  'stage'
  'prod'
  'dr'
])
param stage string = 'test'

@description('The application that the resource(s) are a part of')
@minLength(3)
@maxLength(15)
param application string = 'securegqldemo'

@description('The region the resource(s) should be deployed to')
param region string = 'useast2'

@description('Host any web resources on Linux instead of Windows')
param hostOnLinux bool = true

@description('Existing Key Vault Secret Name(s)')
param existingKeyVaultSecrets array = [
]
As you can see, each defined parameter has been given a description, some potential validation rules and then the parameter declaration itself in the form of param <name> <type> [= <default>]. The next section of the template calls out the expected 'scope' of the template. In this case, we expect the template to function at the 'subscription' scope, primarily due to the fact that we will be creating resource groups, so using the default 'resource group' scope will not work.
// Target the overall file at the subscription level
// Modules are then targetted at the appropriate resource group
targetScope = 'subscription'
Following the targetScope setup, we define the resources and linked modules. Using the targetScope of 'subscription' allows us to create resource groups, which is great, but we then need to let the linked modules know the scope within which they should execute. In this case, we want to create the resource group, and then execute the base module in the scope of that newly created resource group. I won't include all the details here, but the general setup looks like this:
resource resourceGroup 'Microsoft.Resources/resourceGroups@2021-04-01' = {
  name: 'rg-${stage}-${application}'
  location: region
}

module baseModule 'roles/base/base.bicep' = {
  scope: resourceGroup
  name: 'baseModule'
  params: {
    application: application
    region: region
    stage: stage
  }
}

//... more module / resource group definitions
Finally, we define the outputs that will be produced by the template. These outputs are used by our DevOps pipeline to drive portions of the deployment process.
// Output created App Service information
output apiAppName string = apiAppModule.outputs.apiApp.properties.name
output webAppName string = webAppModule.outputs.webApp.properties.name
output funcAppName string = funcAppModule.outputs.funcApp.properties.name
Outputs take the form of output <name> <type> = <value>. The values here are pulled from the outputs of the linked modules and appear in the resulting JSON output from the deployment command. Speaking of modules, let's take a look at the 'API App' module used to setup resources for our current deployment.
The 'apiapp' module
Bicep modules are themselves Bicep templates and follow the same structure. The module terminology is used when a given template is designed to be included in another template for reusability or to improve readability. The API module sets up two different resources, an App Service Plan and an App Service. The App Service Plan provides the infrastructure that runs any associated App Services. The module layout is essentially the same as the playbook template, defining parameters, resources and finally outputs. First, let's take a look at the service plan setup:
var planKind = isLinux ? 'linux' : 'app'

resource servicePlan 'Microsoft.Web/serverfarms@2020-12-01' = {
  name: 'plan-${stage}-${application}'
  location: region
  kind: planKind
  properties: {
    reserved: true
  }
  sku: {
    name: 'F1'
    capacity: 1
  }
  tags: {
    environment: stage
    application: application
  }
}
This section uses a new concept, variables, to provide an interim storage space for calculated data (in this case, the kind of app service plan). Variables are defined as var <name> = <value> and the type of the variable is inferred from the assigned value.
The resource <localname> <resource type@api version> = { } syntax is how we represent the resource we want to exist. This is our 'desired state' and represents how we want the resource to look post deployment. The resource manager will determine which steps are necessary to create and/or update the resource to match our desired state.
NOTE: this application uses Linux-based hosting, which as of this writing, requires the 'reserved' property set to 'true' or the App Service Plan will be created as a 'Windows' instance regardless of the 'kind' setting.
Once the service plan is created, we can define the App Service itself, referencing the plan via the assigned local name (servicePlan).
var appKind = isLinux ? 'app,linux' : 'app'

resource apiApp 'Microsoft.Web/sites@2018-11-01' = {
  name: 'app-${stage}-${application}-api'
  location: region
  kind: appKind
  properties: {
    serverFarmId: servicePlan.id
    enabled: true
    httpsOnly: false
    siteConfig: {
      numberOfWorkers: 1
      linuxFxVersion: 'DOTNETCORE|5.0'
      windowsFxVersion: 'DOTNETCORE|5.0'
      appSettings: [
        {
          name: 'AzureB2C_Demo_API__ClientId'
          value: '@Microsoft.KeyVault(SecretUri=https://kv-${stage}-${application}.vault.azure.net/secrets/ApiApp-AzureB2C-Demo-API-ClientId/)'
        }
        {
          name: 'AzureB2C_Demo_UI__ClientId'
          value: '@Microsoft.KeyVault(SecretUri=https://kv-${stage}-${application}.vault.azure.net/secrets/ApiApp-AzureB2C-Demo-UI-ClientId/)'
        }
        {
          name: 'AzureB2C_Demo_UI__ClientSecret'
          value: '@Microsoft.KeyVault(SecretUri=https://kv-${stage}-${application}.vault.azure.net/secrets/ApiApp-AzureB2C-Demo-UI-ClientSecret/)'
        }
      ]
    }
  }
  identity: {
    type: 'SystemAssigned'
  }
  tags: {
    environment: stage
    application: application
  }
}
App Service setup is a little more complicated than the plan, but still relatively easy to read. We define the name, location and kind of App Service to create, then define any properties of the service and the type of identity we want the service to use. In this case, we leverage a SystemAssigned identity so we can give that identity access to the associated Key Vault to read any secrets that the App Service needs. This allows us to store the secrets in Key Vault and provides operations staff with a way to manage those secrets outside the development/build pipeline.
NOTE: As seen above, there are appSettings properties which override values in appsettings.json. These property values are assigned from Key Vault and must be named appropriately so the runtime can locate the appropriate appsetting value. In this case, '__' is used in place of the normal ':' character to indicate hierarchy within the appsettings.json file. In Linux App Services, these values end up as environment variables, so we must restrict any appsettings.json hierarchy keys to alphanumeric and '_' values (essentially environment variable name rules on Linux). As such, this branch of the code renamed some appsettings.json values to match these limitations (primarily replacing '-' with '_').
Existing Resources and Conditionals
Referencing pre-existing resources is another important Bicep feature. The 'webapp' role shows an example of this feature by referencing the existing storage account that was created as part of the 'base' role. Two things of note here, one is the use of the 'existing' keyword and the second is that the 'webapp' module in the playbook takes an auto-generated dependency on the 'base' module to ensure the storage account exists prior to module execution.
// webapp.bicep
// ...
resource storageAccount 'Microsoft.Storage/storageAccounts@2021-04-01' existing = {
  name: storageAccountName
}
// ...
As you can see above, referencing the existing resource looks alot like declaring the resource, but instead of supplying desired state details, the 'existing' keyword is used and just the name is supplied.
// playbook.bicep
// ...
module webAppModule 'roles/webapp/webapp.bicep' = {
  scope: resourceGroup
  name: 'webAppModule'
  params: {
    application: application
    region: region
    stage: stage
    storageAccountName: baseModule.outputs.storageAccountName
    storageAccountStaticWebEndpoint: baseModule.outputs.storageAccountStaticWebsiteHost
  }
}
// ...
Representing dependencies is relatively simple. Add the 'dependsOn' property to any resource and supply an array of the local name(s) that the resource depends on, or reference other resources by their symbolic name. In this case, the Bicep infrastructure adds an implicit 'dependsOn' due to the fact that the params property references the baseModule by name. The 'webapp' module shows how to use the explicit version of dependsOn when executing the Azure CLI command to enable static web hosting from the storage account. Bicep does the work of figuring out how to map these dependencies into the final ARM template that gets deployed.
// webapp.bicep
// ...
resource webScript 'Microsoft.Resources/deploymentScripts@2020-10-01' = {
  kind: 'AzureCLI'
  name: 'enableBlobStaticWeb'
  location: region
  identity: {
    type: 'UserAssigned'
    userAssignedIdentities: {
      '${managedIdentity.id}': {}
    }
  }
  dependsOn: [
    roleAssignmentContributor
    roleAssignmentStorageBlobDataContributor
  ]
  properties: {
    azCliVersion: '2.26.1'
    cleanupPreference: 'OnSuccess'
    scriptContent: 'az storage blob service-properties update --account-name ${storageAccount.name} --static-website --404-document index.html --index-document index.html'
    retentionInterval: 'PT4H'
  }
}
// ...
Conditionals are another powerful tool when creating Bicep templates. The 'keyvault' role shows how resource deployment can be conditioned on parameters to the template.
// keyvault.bicep
// ...
// This will create the shells for the needed secrets, the actual values need to be filled in via
// the Key Vault portal or other external scripts
resource apiAppApiClientId 'Microsoft.KeyVault/vaults/secrets@2019-09-01' = if (!contains(existingSecrets, 'ApiApp-AzureB2C-Demo-API-ClientId')) {
  name: '${keyVault.name}/ApiApp-AzureB2C-Demo-API-ClientId'
  properties: {
    value: '<fill in portal>'
  }
}
// ...
In order to leverage conditionals, the 'if (...)' clause is added after the '=' sign in the resource definition. In our case, we're checking to see if the secret we want to deploy is in our existing list of secrets. If so, we want to avoid deploying it again and overwriting the existing secret value with dummy data.
Speaking of KeyVault...
Another unique feature that's worth calling out here is how the Key Vault access policies are compiled:
// keyvault.bicep
// ...
var appPolicy = apiAppName != '' ? [
{
  objectId: apiApp.identity.principalId
  tenantId: subscription().tenantId
  permissions: {
    keys: [
      'get'
    ]
    secrets: [
      'get'
    ]
    certificates: [
      'get'
    ]
  }
}
] : []

var funcPolicy = funcAppName != '' ? [
{
  objectId: funcApp.identity.principalId
  tenantId: subscription().tenantId
  permissions: {
    keys: [
      'get'
    ]
    secrets: [
      'get'
    ]
    certificates: [
      'get'
    ]
  }
}
] : []

var webPolicy = webAppName != '' ? [
{
  objectId: webApp.identity.principalId
  tenantId: subscription().tenantId
  permissions: {
    keys: [
      'get'
    ]
    secrets: [
      'get'
    ]
    certificates: [
      'get'
    ]
  }
}
] : []

var vaultPolicies = concat(appPolicy, funcPolicy, webPolicy)
// ...
In this snippet, I've used the ternary operator to assign a local variable for each of the three possible access policies that may be needed in our deployment. Then we concatenate the three (potentially empty) arrays into a single resulting array of only the policies we need to deploy. Originally, I had tried something more 'C# like' by using the ternary operator to return a policy or null, but this ended up failing to compile as null isn't considered an appropriate object type for a vault policy. The array concatenation approach provided a relatively clean alternative.
Executing the Bicep Playbook
Once the Bicep templates are in place, we can run a test deployment direct from the command line. To do this, a couple preliminary steps are required:
az login
This launches a browser window to prompt you to login to your subscription. Once logged in, you'll be presented with a list of available subscriptions.
az account set --subscription '<subscription id>'
Now you're ready to execute your test deployment (line breaks added for readability):
az deployment sub create --location eastus2
                         --template-file playbook.bicep
                         --parameters vars/playbook.parameters.json vars/playbook.parameters.test.json
The result of this command includes the outputs discussed earlier, as seen here:
{
    // ...
    "outputs": {
      "apiAppName": {
        "type": "String",
        "value": "app-test-securegqldemo-api"
      },
      "funcAppName": {
        "type": "String",
        "value": "func-test-securegqldemo"
      },
      "webAppName": {
        "type": "String",
        "value": "app-test-securegqldemo-web"
      }
    },
    // ...
}
We'll use these values in our automated deployment in a bit, but that pretty much wraps up the Bicep / infrastructure side of the solution.
Automating the Build & Deployment - Preliminaries
Our solution is going to leverage Azure DevOps Pipelines for automating the build and deployment process. DevOps provides a rich suite of build functionality and built-in Azure support to connect with our Azure subscription. To work through this section, you'll need an Azure account and access to a DevOps instance. You can use the built-in Git repositories in DevOps for this, or leverage GitHub connectivity to access a Git repository on GitHub (which is what I'm doing for this post).
NOTE: If you will want to do any YAML build editing inside Visual Studio Code (my preferred approach), then you'll probably want to add the 'Azure Pipelines' extension to your Code environment. You can tell VS Code to treat the YAML file you're editing like an Azure Pipelines file and get better Intellisense support
Adding the Azure Service Connection
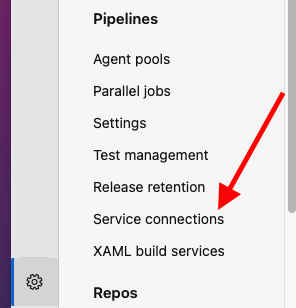
Our build and deployment process will utilize Service Connections, so let's get those setup first. On most pages of your project in DevOps, there should be a small 'gear' icon that you can click to go into the project settings.
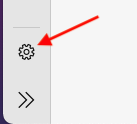 DevOps - Project Settings Gear Icon
In the 'Pipelines' area of the project settings, find the 'Service Connections' section:
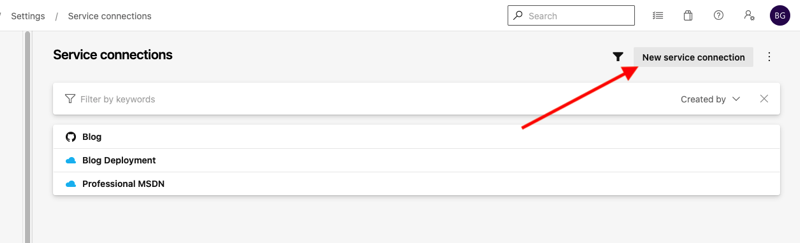
 DevOps - Pipelines - Service Connections
Here, you will find all the external service connections that your project can use. We'll add a new one for our blog sample. Click the 'New Service Connection' button in the upper right corner of the screen, then select 'Azure Resource Manager' and 'Service principal (automatic)' from the subsequent setup steps.
 DevOps - Pipelines - Service Connections - List
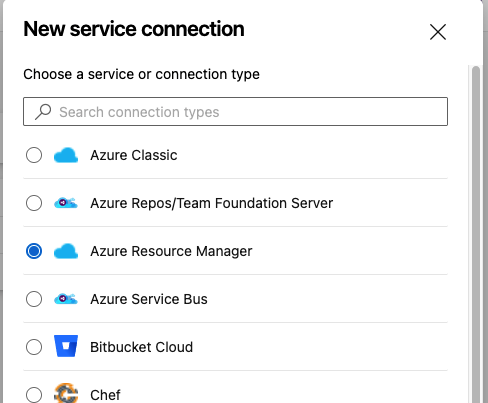 DevOps - Pipelines - Service Connections - New Service Connection - Select Type
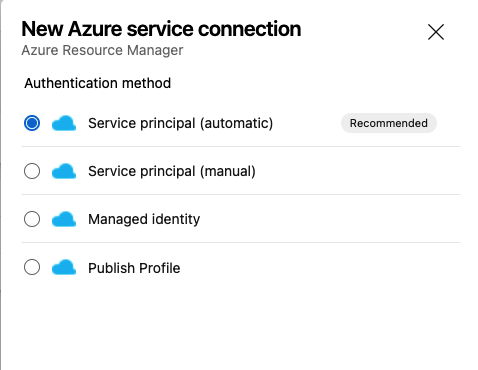 DevOps - Pipelines - Service Connections - New Service Connection - Select Authentication
Clicking 'Next' after selecting the authentication method should bring you to the details of the service connection. This will try to fire a login popup to prompt you to authenticate with Azure AD (check your popup blocker for this). Leave the connection at the 'Subscription' level and select the subscription you want to connect to. If the selected subscription isn't the default selected one, it'll prompt you to login -again-. You can leave the 'Resource Group' selection empty, and then fill in a sensible name and description and click 'Save'. This will wire up all the things necessary for DevOps to access your subscription on your behalf. Of note, I've left the 'Grant access permission to all pipelines' checkbox selected, but if you want to lock down the connections to only specific pipelines, you can de-select this checkbox before saving.
 DevOps - Pipelines - Service Connections - New Service Connection - Connection Details
Adding the GitHub Service Connection
In my case, I also need a connection to GitHub to trigger my build on commit. The setup there is fairly similar, so hit 'New Service Connection' again and select 'GitHub' as the type, then walk through the steps to get your GitHub connection configured. I used the 'Grant Authorization' method, and just called mine 'Blog' (as shown in the screenshot above). This will walk you through the GitHub authorization process and add the service connection to the list.
Automating the Build & Deployment - Building the API
The first step in our build and deployment process is to build (compile) and package (publish) our API + GraphiQL front-end codebase. Let's create a pipeline to do this, click the 'Pipelines' (rocketship) icon in DevOps and click the 'New Pipeline' to get started.
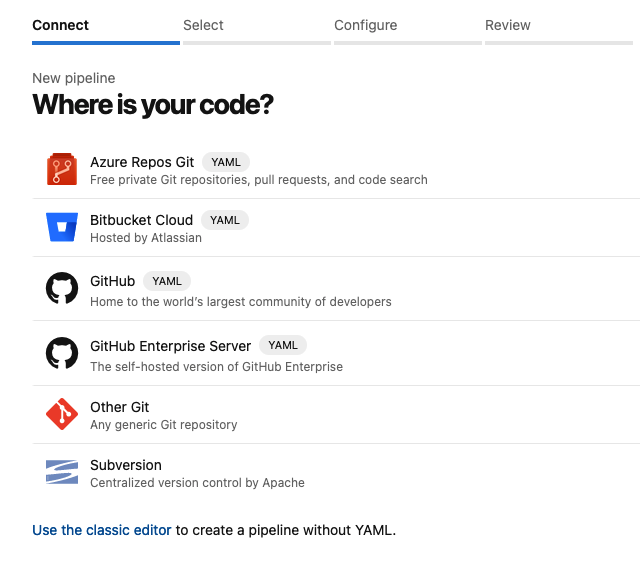 DevOps - Pipelines - New Pipeline - Select Source
Here, select the source code that will be tracked to trigger your build. In my case, I chose 'GitHub' and the system presented me with a list of existing repositories to choose from. I selected the demo repository and then the 'Sample' YAML pipeline. This drops you into an online editor to define your build. The file name can be changed if desired, and changes made here will be directly committed to the selected repository.
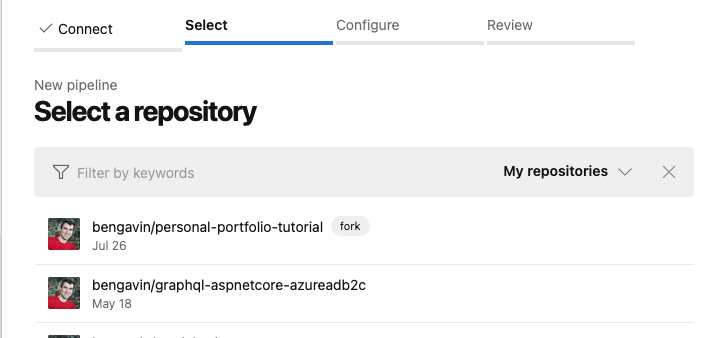 DevOps - Pipelines - New Pipeline - Select Repository
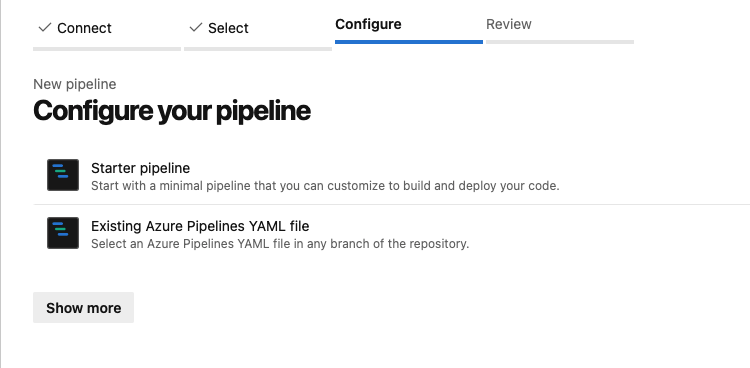 DevOps - Pipelines - New Pipeline - Configure Pipeline
 DevOps - Pipelines - New Pipeline - Review
For this first pipeline iteration, we want only to build the API project and package it for later publishing. To do this, we're going to replace 'steps' in the initial starter with the following:
# Trigger and pool can stay, we want to add 'stages' in place of 'steps'

stages:
- stage: BuildApiStage
  displayName: Build API
  jobs:
    - job: BuildApiJob
      displayName: Build Api
      steps:
        - task: DotNetCoreCLI@2
          displayName: dotnet build
          inputs:
            command: 'build'
            projects: 'api/StarWars.API.csproj'

        - task: DotNetCoreCLI@2
          displayName: dotnet publish
          inputs:
            command: 'publish'
            projects: 'api/StarWars.API.csproj'
            arguments: '--output $(Build.ArtifactStagingDirectory)'
            zipAfterPublish: true

        - task: PublishPipelineArtifact@1
          displayName: Publish API package to pipeline
          inputs:
            targetPath: '$(Build.ArtifactStagingDirectory)/api.zip'
            artifact: 'ApiPackage'
            publishLocation: 'pipeline'
A note here, this solution is directly leveraging Pipeline multi-stage support rather than having a core 'build pipeline' and pulling in subsequent classic 'release pipeline(s)'. This allows me to keep everything in YAML directly and allows the end-to-end process to remain version controlled with git. Now click the 'Save and Run' button, this will give you the option to save directly to the main branch, or to create a new branch containing the build script (to accommodate pull requests, peer reviews, etc).
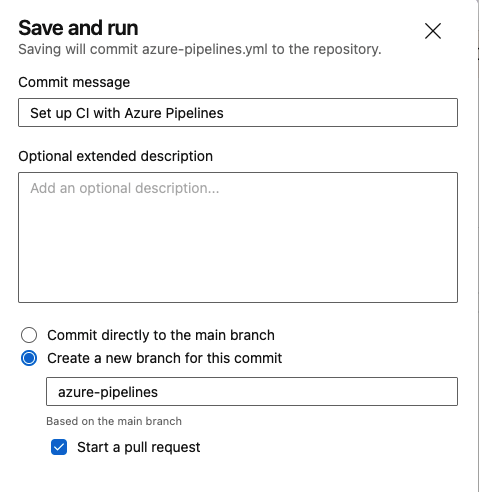 DevOps - Pipelines - Walkthrough - Save and Run
Keep in mind, branching in this way always builds a branch from 'main'. If this isn't desired, simply copy the YAML contents into a new file in your desired branch, then push the branch up to the repository. Then when setting up the pipeline, choose an 'Existing Azure Pipelines YAML file' and select your branch + file. Either way, when run, the pipeline thus far looks like this:
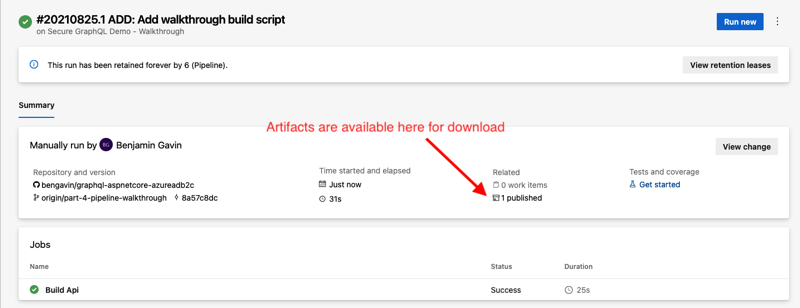 DevOps - Pipelines - Walkthrough - Stage 1 Result Summary
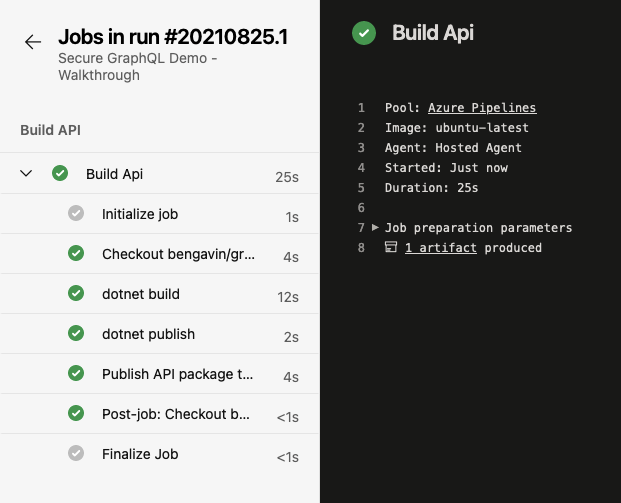 DevOps - Pipelines - Walkthrough - Stage 1 - Build Api Details
In the above images, you can see a basic summary of the build execution as a whole (the first image) and details about each of the steps that make up the job (in the second image). The summary page also includes a link to download any published artifacts (in our case a ZIP file of the API codebase).
NOTE: If we had done any appsettings.json secret replacements during the package/publish step, these would be stored and published inside this artifact. Therefore, it's important NOT to do such things at this phase in the pipeline. We want to do that secret replacement just prior to publishing, or rely on App Service configuration to manage this. I'll show the latter approach in this article.
Automating the Build & Deployment - Publishing the API
Alright, now that we have our API package being built, we need to move into how to deploy (publish) that package to the environments in our system. Over the long term, we'll want to publish to a test environment, a staging environment and a production environment. For this post, we'll just cover test/staging, but the concept can be easily extended to our production system when it's ready to go.
Creating a Reuseable Deployment Template
Since we know that we want to publish to multiple environments, and since the steps to publish are unlikely to change much from environment to environment, we'll leverage a cool feature of pipelines that allows us to reference the same 'block' of YAML code multiple times, similar to a function call in C#. Let's create our 'stage deployment' YAML file, I'll cover each 'section' in turn so it's not quite so much at once.
NOTE: This step needs to be done outside the online Pipeline editor, as it does not currently support editing referenced YAML files
# azure-pipelines-deploy-stage.yaml
# All parameters are required
parameters:
  - name: serviceConnection
    type: string
  - name: environment
    type: string

jobs:
# ... our job goes here
The 'parameters' section defines our 'inputs' to this YAML template. This includes the service connection we want to use for deployments and the environment we are deploying to. We then include a list of 'jobs' which comprise the majority of this template.
# ... parameters and such
- job: DeployEnvironmentJob
  displayName: Deploy ${{ parameters.environment }} environment
  steps:
  - task: AzureCLI@2
    displayName: Deploy Bicep template
    inputs:
      azureSubscription: ${{ parameters.serviceConnection }}
      scriptType: 'bash'
      scriptLocation: 'inlineScript'
      workingDirectory: 'infrastructure'
      addSpnToEnvironment: true
      inlineScript: |
        echo "Check for Key Vault existence"
        resourceGroupName=rg-$(Deployment.Environment)-$(Deployment.Application)
        vaultName=kv-$(Deployment.Environment)-$(Deployment.Application)
        echo "Executing: az keyvault list --resource-group $resourceGroupName --query '[].name' --output tsv | grep $vaultName"
        vaultNames=`az keyvault list --resource-group $resourceGroupName --query '[].name' --output tsv | grep $vaultName`
        echo "Found Key Vault: $vaultNames == $vaultName"

        secretNames='[]'
        if [ "$vaultNames" != "" ]; then
          echo "Ensure secret list permissions"
          az keyvault set-policy --name $vaultName --secret-permissions list --spn $servicePrincipalId

          echo "Retrieving Existing Key Vault Secret Name(s)"
          secretNames=`az keyvault secret list --vault-name $vaultName --query '[].name' --output json`
        fi
        echo "Key Vault Secret Name(s): $secretNames"

        echo "Deploying Bicep Template..."
        echo "az deployment sub create --name playbook-$(Deployment.Environment)-$(Deployment.Application) --location $(Deployment.Metadata.Location) --template-file playbook.bicep --parameters vars/playbook.parameters.json vars/playbook.parameters.$(Deployment.Environment).json existingKeyVaultSecrets=\"$secretNames\""
        outputs=`az deployment sub create --name playbook-$(Deployment.Environment)-$(Deployment.Application) --location $(Deployment.Metadata.Location) --template-file playbook.bicep --parameters vars/playbook.parameters.json vars/playbook.parameters.$(Deployment.Environment).json existingKeyVaultSecrets="$secretNames"`
        echo $outputs

        echo "Capturing outputs..."
        echo $outputs | jq -c '.properties.outputs | to_entries[] | [.key, .value.value]' |
          while IFS=$"\n" read -r c; do
            outputname=$(echo "$c" | jq -r '.[0]')
            outputvalue=$(echo "$c" | jq -r '.[1]')
            echo "##vso[task.setvariable variable=Deployment.Output.$outputname]$outputvalue"
          done
# ... more tasks
The first task in the job is by far the most complex. This complexity is primarily to workaround some limitations in the Bicep tooling (I mentioned it has some, right? :)). Here, we are looking to see if the Key Vault we're going to deploy into exists, and if so, which secrets it already contains. We pass the existing secret names to our Bicep template and then capture the template outputs into Pipeline variables. Also included in this script are a series of 'debug' outputs so you can review what's happening during script execution.
One additional note, as we setup the Azure CLI job, we're passing in the service connection to use and indicating the 'Service Principal' (SPN) that is associated with the service connection should be made available to the script being executed. We do this so we can ensure that we have read access to the Key Vault secret names, as the Bicep deployment itself will eliminate those access policies.
# ... previous tasks
  - task: DownloadPipelineArtifact@2
    displayName: Download API Package
    inputs:
      buildType: 'current'
      artifactName: ApiPackage
      targetPath: '$(System.ArtifactsDirectory)'
# ... more tasks
This next portion indicates to Pipelines that we should download an artifact from the pipeline, in this case, our packaged API code.
# ... previous tasks
  - task: FileTransform@1
    displayName: Update settings file(s)
    inputs:
      folderPath: '$(System.ArtifactsDirectory)/api.zip'
      fileType: 'json'
      targetFiles: 'appsettings.json'
# ... more tasks
Once we've downloaded the artifact we can transform-in-place the appsettings.json file with any environment specific data. The 'what' of replacement is handled by variables supplied to this template (as compared to parameters which are explicit during template inclusion). We'll cover how those variables are setup a little later in the article.
# ... previous tasks
  - task: AzureRmWebAppDeployment@4
    displayName: Publish API Package
    inputs:
      ConnectionType: 'AzureRM'
      azureSubscription: ${{ parameters.serviceConnection }}
      appType: 'webAppLinux'
      WebAppName: '$(Deployment.Output.apiAppName)'
      packageForLinux: '$(System.ArtifactsDirectory)/api.zip'
Lastly, we actually perform the deployment, which pushes the now transformed and packaged code out to our destination App Service. The App Service we publish to is identified by an output from the first Azure CLI task that deployed the Bicep template.
Consuming the Deployment Template
Now that we've defined what our deployments look like, we can add the various stages to our pipeline that represent our environments. To do that, we edit the main pipeline file to include the additional stages.
# azure-pipelines-walkthrough.yaml
# ... trigger / pool info

# NOTE: This is a workaround for service connections not supporting variable replacement
#       at runtime (see: https://developercommunity.visualstudio.com/t/using-a-variable-for-the-service-connection-result/676259)
parameters:
- name: TestEnvironmentServiceConnection
  default: $(Deployment.Subscription.Test)
  type: string
- name: StageEnvironmentServiceConnection
  default: $(Deployment.Subscription.Stage)
  type: string

# ... build stage

- stage: TestEnvironmentStage
  displayName: Test Environment
  dependsOn: BuildApiStage
  variables:
    - group: securegqldemo - Test
  jobs:
    - template: "azure-pipelines-deploy-stage.yaml"
      parameters:
        serviceConnection: ${{ parameters.TestEnvironmentServiceConnection }}
        environment: Test
# ... other stages
First, we need to add a new 'parameters' section to the main file, above the 'stages' section. These parameters overcome a current limitation in Pipelines around referencing service connections, and set us up so we could potentially use different service connections for each stage of the pipeline.
Then, after the 'BuildApi' stage, we add a new stage to perform the test deployment. This stage depends on the BuildApi stage, since we require that artifact to be built before we can deploy it. The stage also references a variable set which I'll cover in the next section. These variables are made available to all portions of the stage.
# azure-pipelines-walkthrough.yaml
# ... parameters / etc
# ... build stage
# ... test stage
- stage: StageEnvironmentStage
  displayName: Stage Environment
  dependsOn: TestEnvironmentStage
  variables:
    - group: securegqldemo - Stage
  jobs:
    - template: "azure-pipelines-deploy-stage.yaml"
      parameters:
        serviceConnection: ${{ parameters.StageEnvironmentServiceConnection }}
        environment: Stage
# ... (future) production stage
The staging deployment stage follows the same pattern as the test stage, but uses a different variable set and depends on the test stage to complete (we don't want to deploy to staging if deployment to test fails).
With that, we can move on to setting up our variable groups that are referenced by the deployment stages.
Setting up Variable Groups
The templates we are using for this solution are designed for re-use across environments. We also may want to allow for certain environments to require approvals or time-boxing of deployments. Variable groups can satisfy both of these features. To add the groups we need, click the 'Libraries' icon on the left hand navigation bar in DevOps.
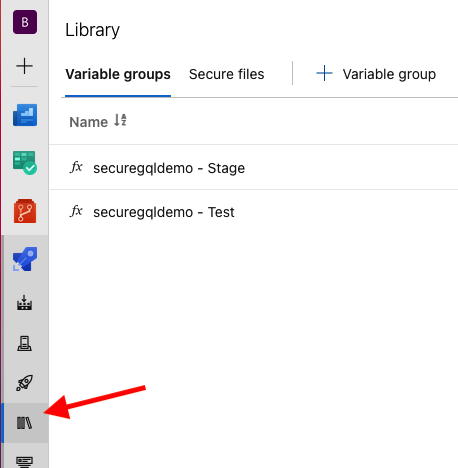 DevOps - Pipelines - Library
The list of variable groups is displayed, and here we can see two variable groups 'securegqldemo - Test' and 'securegqldemo - Stage'. I've included a screenshot below to show the contents of the test variable group.
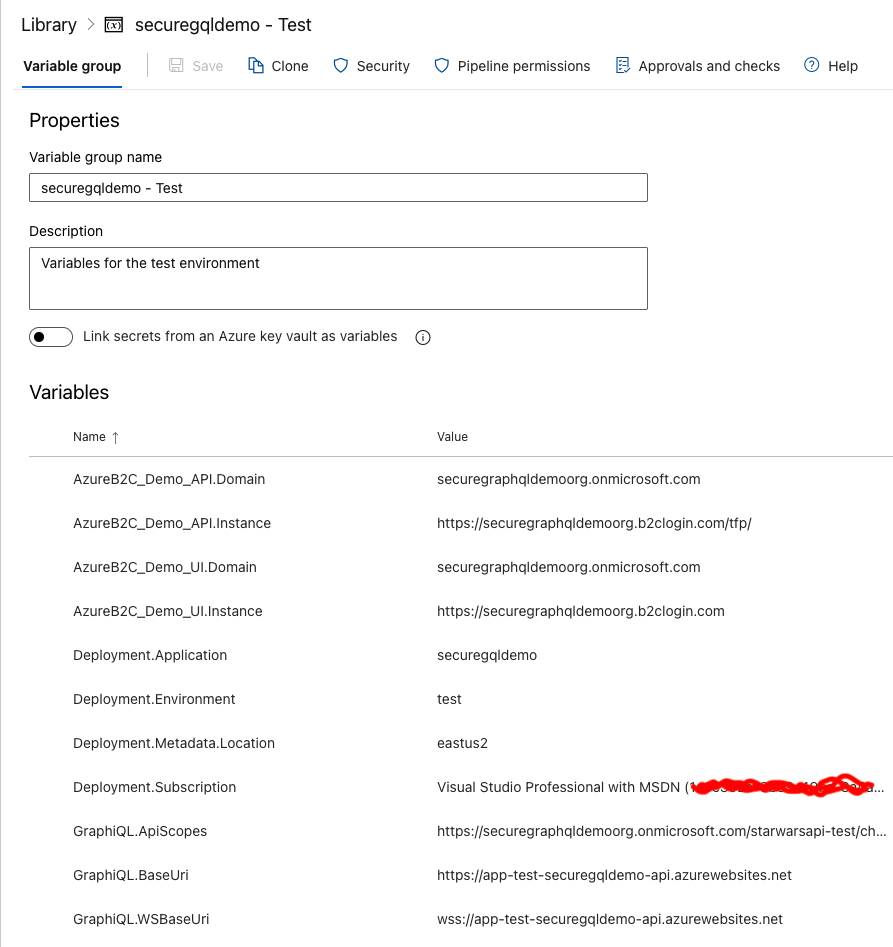 DevOps - Pipelines - Library - securegqldemo - Test
The variables here are used for two purposes:
- To control aspects of the build pipeline (e.g. resource names)
- To overwrite appsettings.json values during the 'File Transform' step in the deployment job.
Variables utilized by the first case are referenced in the YAML files using the $(<varname>) syntax. This causes the value of the variable to be used in that particular job/task, and the format of the variable name is up to the pipeline creator.
Variables that are used for the second use case, file transform, are required to follow the same hierarchy as the appsettings.json file, with the normal ':' character replaced with the '.' character (e.g. GraphiQL:ApiScopes -> GraphiQL.ApiScopes). The variable values are automatically consumed by the file transform step, replacing the value of the matched property with the value of the variable, then saving the resulting file.
The staging variable group looks exactly like the test variable group, with the exception of the variable values changing to match that environment. Additionally, I've configured an approval gate for this library.
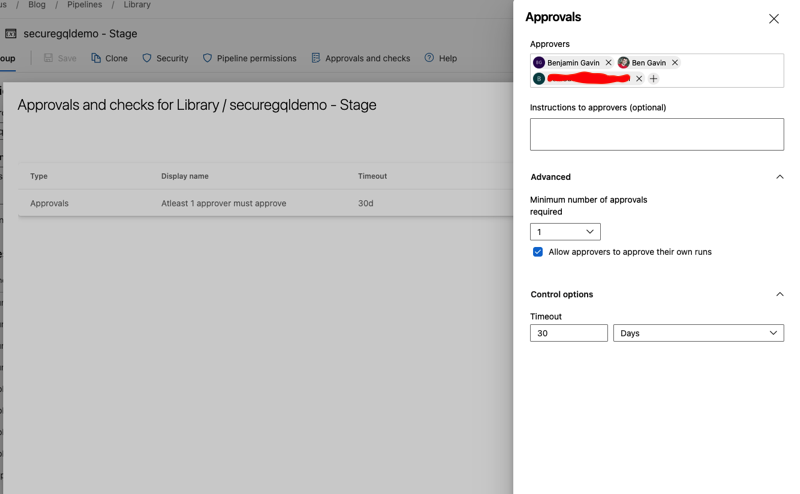 DevOps - Pipelines - Library - securegqldemo - Stage - Approvals and checks
Adding this approval step means that the build will 'pause' at any stage/job which requires access to this variable group (including re-runs of the stage/job). Approvers will be notified that an approval is required and then can visit the build in DevOps to provide the approval (or rejection) as needed. Once the 'gate' is cleared, the variable group is made accessible and the pipeline continues.
Pulling it all together
The final step is to add a couple 'Variables' to the pipeline itself. This is to facilitate the linkage with the service connections. Go to the pipeline listing and choose the '3 dots' menu next to your pipeline and then 'Edit'. Once there, click the 'Variables' button in the upper right.
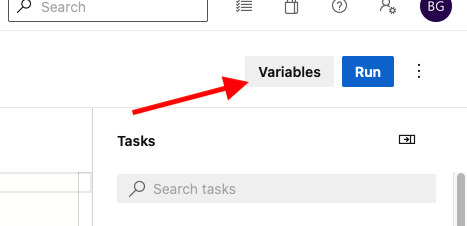 DevOps - Pipelines - Edit Pipeline - Variables
These are the pipeline specific variables (available to all stages of the pipeline automatically), and are stored as part of the pipeline metadata. Click 'New Variable' and add two new variables, named Deployment.Subscription.Test and Deployment.Subscription.Stage. Both variables should have the value of the new service connection that was created to point to your Azure subscription.
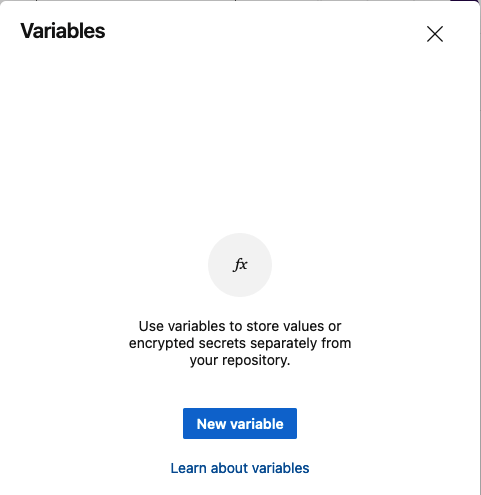 DevOps - Pipelines - Edit Pipeline - New Variable
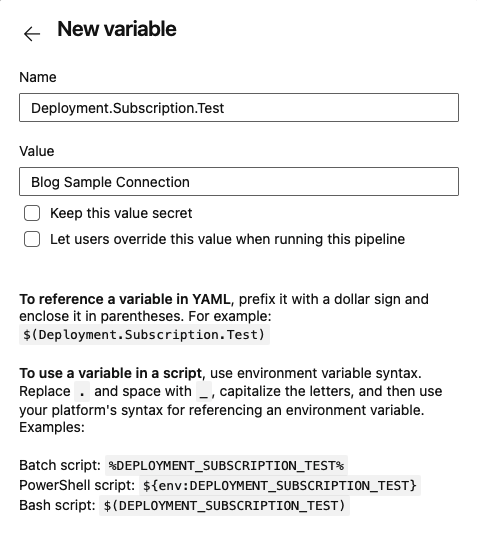 DevOps - Pipelines - Edit Pipeline - Add Variable
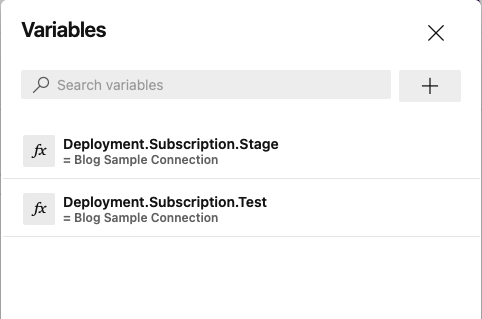 DevOps - Pipelines - Edit Pipeline - Variable List
Once the variables have been added, we're ready to run the pipeline! Clicking 'Run' (next to the 'Variables' button) will launch the run dialog. You may need to select the appropriate branch (if you aren't editing from 'main'), and you probably want to check the 'system diagnostics' button at the bottom the first time you run the pipeline.
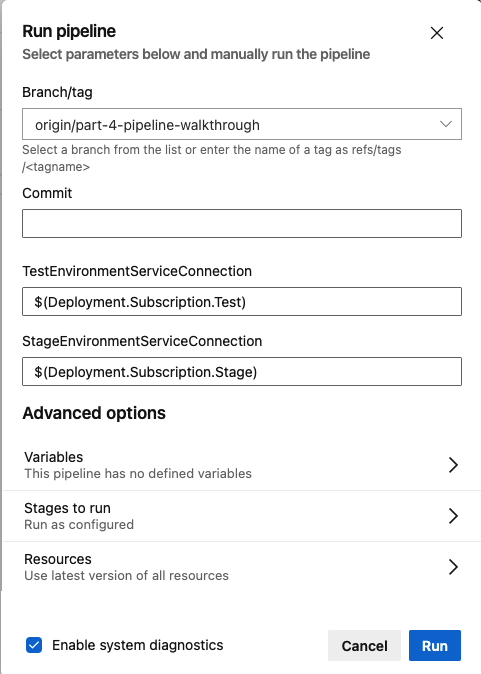 DevOps - Pipelines - Run Pipeline - Run Dialog
Running the pipeline now results in the following summary data (note the addition of the 'Stages' tab on the summary screen).
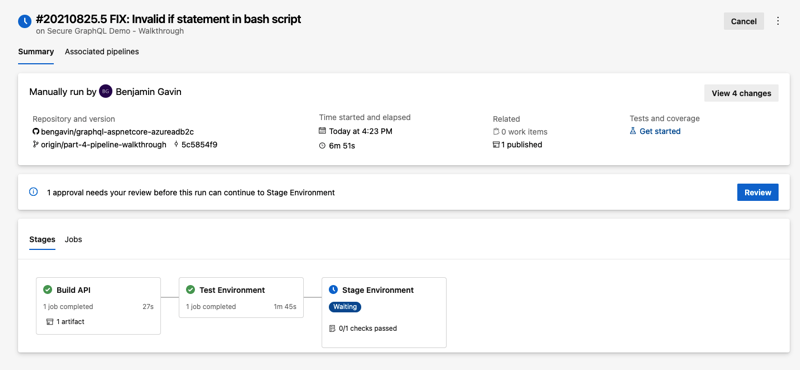 DevOps - Pipelines - Completed Build
As you can see, 'Test' has processed through automatically and we now have the 'Stage' approval waiting for our action (or waiting for whomever you designated as an approver). Clicking the 'Review' button provides an approval review dialog:
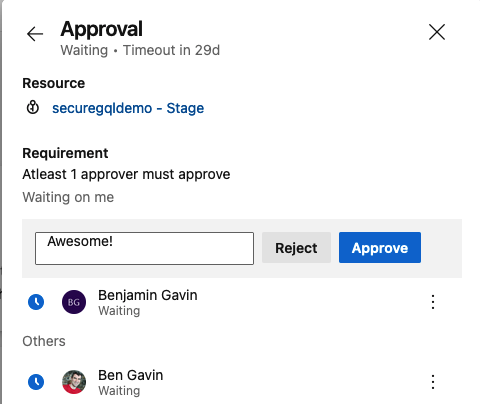 DevOps - Pipelines - Build Summary - Approve Stage
Hitting the 'Approve' button will release the Stage deployment and allow it to proceed. That's it, nice work!
 Staging Environment - Running App
Wrap Up
In this post, we created the 'Infrastructure as Code' artifcats to represent our test and staging environments for our secured GraphQL API. We then created an Azure DevOps Pipeline, along with supporting Library Variable Groups, to successfully provision the environments and deploy our code. Lastly, after running the pipeline, we walked through the approval process and saw our code running successfully! The code is available here (in the part-4-bicep branch) if you're interested.
Our secured API has now been successfully deployed, in Part 5, we'll create a customized React client application to access our API. See you next time!
- Part 1 - Create the API
- Part 2 - Configuring Azure Active Directory B2C
- Part 3 - Integrating the GraphQL Server API with Azure AD B2C
- Part 4 - Automating Build & Deployment to Azure App Service <== You're here!
- Part 5 - Consuming the Secured GraphQL API from a React App
Until then, happy coding!
Credits
I want to thank my colleagues at Core BTS for all their assistance in the preparation of this post. Their technical expertise and willingness to share that knowledge is truly inspiring. Specifically, I'd like to thank Andrew Petersen, Tim Miller and Eric Grover for their technical reviews and feedback.