Silverlight MVVM Drag & Drop – TreeView, Meet ListBox
Introduction
In my previous two articles, I covered using Drag & Drop for both the ListBox and the TreeView controls, leveraging the Silverlight Toolkit’s ItemsControlDragDropTarget derived classes to provide a rich user experience [UX]. In this article, I want to tie the two technologies together to provide a rich UX for editing categories and an associated item, in this case, Images. The scenario is born out of a recent Silverlight 4 application I worked on to allow the maintenance of Categories and associated Images.
In this post, I’ll be starting with the end result of my TreeView MVVM Drag & Drop article, and extending it to include a ListBox on the right half of the screen which will contain the list of images that belong to the currently selected category. I’ll be making a few enhancements to the result of the last article behind the scenes, and I’m not going to cover all of those, just focus on the interaction between the TreeView and ListBox and the various Drag & Drop capabilities that Silverlight provides out-of-the-box with the Silverlight Toolkit.
The Goal
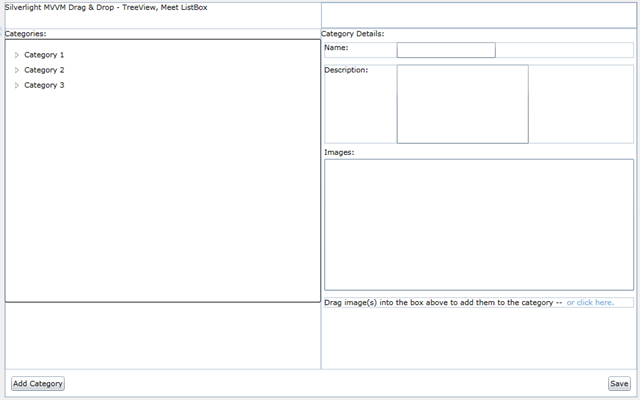
The goal of the application will be to present the TreeView of categories on the left-hand side of the screen, and a ListBox on the right-hand side which represents all images for the currently selected category. The ListBox will allow the user to drop images into it for addition to the category, and we will also provide a link that launches a standard multi-select OpenFileDialog window to upload files. As with the previous example, categories can be added, removed and reordered within the tree. The images in the list can also be reordered by simple drag & drop operations and images can be dragged from the ListBox onto another category to move the image from one category to another. For now, we’ll leave the ‘Save’ button in place, but a better UX may be to split the editing of categories/image data into dialogs and auto-save any drag & drop interactions. We’ll provide deletion capabilities for the category and image using ‘hover icons’. An example screenshot is shown below [no SketchFlow license here, sorry]:
The Data Model
The data model from the last article gets a minor update with the addition of an Images entity, with reference to the Category to which it belongs. The important pieces here are the image Name, Sequence and GalleryData fields, which hold the name of the image, order within the parent category and the associated image data respectively. For this example, we’re going to store the image data in the database rather than worry about uploading the files to another location [and I’m not going to try to address the holy war about where the images should be ‘properly’ stored].
 Entity Data Model Diagram
The View
The view from the previous example has been updated to support the additional ListBox, along with the appropriate Blend behaviors to link everything together. The hover icons are implemented using of Triggers and the VisualStateManager to control the current visual state. We’re going to continue using the TreeViewBoundSelectedItemBehavior that we used in the last article to track the currently selected TreeView item, until such point as the TreeView control supports direct binding to the SelectedItem property. I’ll include the TreeView’s ItemTemplate below to show an example of the hover icon capabilities.
TreeView.ItemTemplate:
<Grid>
    <Grid.ColumnDefinitions>
        <ColumnDefinition Width="Auto" />
        <ColumnDefinition />
    </Grid.ColumnDefinitions>

    <i:Interaction.Triggers>
        <i:EventTrigger EventName="MouseEnter">
            <ia:GoToStateAction StateName="MouseOver"/>
        </i:EventTrigger>
        <i:EventTrigger EventName="MouseLeave">
            <ia:GoToStateAction StateName="Default"/>
        </i:EventTrigger>
    </i:Interaction.Triggers>

    <VisualStateManager.VisualStateGroups>
        <VisualStateGroup x:Name="Mouse">
            <VisualState x:Name="Default" />
            <VisualState x:Name="MouseOver">
                <Storyboard>
                    <ObjectAnimationUsingKeyFrames
                          Storyboard.TargetProperty="(UIElement.Visibility)"
                          Storyboard.TargetName="HoverOverlay">
                        <DiscreteObjectKeyFrame KeyTime="0">
                            <DiscreteObjectKeyFrame.Value>
                                <Visibility>Visible</Visibility>
                            </DiscreteObjectKeyFrame.Value>
                        </DiscreteObjectKeyFrame>
                    </ObjectAnimationUsingKeyFrames>
                </Storyboard>
            </VisualState>
        </VisualStateGroup>
    </VisualStateManager.VisualStateGroups>
    <VisualStateManager.CustomVisualStateManager>
        <ia:ExtendedVisualStateManager/>
    </VisualStateManager.CustomVisualStateManager>

    <!-- Mouse Capture Box -->
    <Rectangle Grid.ColumnSpan="2"
                HorizontalAlignment="Stretch"
                VerticalAlignment="Stretch"
                Fill="Transparent" />

    <TextBlock Text="{Binding Category.Name}" Height="20" />

    <StackPanel Grid.Column="1" x:Name="HoverOverlay"
                 Orientation="Horizontal"
                 Visibility="Collapsed">
        <Button Content="X" Margin="10,0,0,0">
            <i:Interaction.Triggers>
                <i:EventTrigger EventName="Click">
                    <ia:CallMethodAction TargetObject="{Binding}"
                                          MethodName="DeleteCategory" />
                </i:EventTrigger>
            </i:Interaction.Triggers>
        </Button>
    </StackPanel>

</Grid>
In the above code, I originally had an issue with the ‘Delete’ button being ‘unclickable’, meaning that when you hovered over the item and slid the mouse to the right to click the button, the button would disappear. I found this to be due to the ‘Margin’ property on the button [or containing StackPanel] leaving a dead space between the two controls and causing the MouseLeave event to fire. This was solved by throwing the transparent Rectangle behind the grid contents which ensured that the MouseLeave event wasn’t fired until the mouse actually left the content area of the TreeViewItem.
To support the dropping of images back onto the TreeViewItem(s), I added an additional Blend Trigger to the TreeViewDragDropTarget, and to support the Drag & Drop operations on the ListBox, I added the ListBoxDragDropTarget, selections from the view XAML are included below:
MainPage.xaml:
<toolkit:TreeViewDragDropTarget AllowDrop="True"
                                HorizontalContentAlignment="Stretch"
                                VerticalContentAlignment="Stretch">
    <i:Interaction.Triggers>
        <i:EventTrigger EventName="ItemDragCompleted">
            <ia:CallMethodAction TargetObject="{Binding}"
                                 MethodName="RealignItemParentage" />
        </i:EventTrigger>
        <i:EventTrigger EventName="Drop">
            <ia:CallMethodAction TargetObject="{Binding}"
                                 MethodName="MoveImage" />
        </i:EventTrigger>
    </i:Interaction.Triggers>

    <!-- ... Tree View Here ... -->

</toolkit:TreeViewDragDropTarget>
<toolkit:ListBoxDragDropTarget Margin="5,2,5,5" AllowDrop="True"
                               HorizontalContentAlignment="Stretch"
                               VerticalContentAlignment="Stretch"
                               Width="430"
                               HorizontalAlignment="Left">
    <i:Interaction.Triggers>
        <i:EventTrigger EventName="ItemDragCompleted">
            <ia:CallMethodAction MethodName="ReorderImages"
                                 TargetObject="{Binding}" />
        </i:EventTrigger>
    </i:Interaction.Triggers>

    <ListBox ItemsSource="{Binding SelectedCategory.Images}"
                AllowDrop="True"
                SelectedItem="{Binding SelectedImage, Mode=TwoWay}"
                MinHeight="200"
                >
        <i:Interaction.Triggers>
            <i:EventTrigger EventName="Drop">
                <ia:CallMethodAction MethodName="ImagesDropped"
                                     TargetObject="{Binding}" />
            </i:EventTrigger>
        </i:Interaction.Triggers>

        <!-- ... ListBox Setup ... -->

    </ListBox>

</toolkit:ListBoxDragDropTarget>
The ViewModel
The ViewModel is where things get a little more involved. I won’t be reproducing the entire ViewModel here, just calling out specific features/changes that enable the new functionality. Previous TreeView functionality support can be reviewed in the TreeView MVVM Drag & Drop article. The reordering of the images in the ListBox builds on the example from my updated ListBox Timing Issue post. To support the drag & drop of images from Windows Explorer onto the Silverlight application, the ImagesDropped method was added, this feature utilizes the ‘like signature’ feature of the Blend CallMethodAction to allow us to receive the arguments of the UI event in the ViewModel to assist in processing.
MainPageViewModel.cs:
public void ImagesDropped(object sender, EventArgs args)
{
    // only handle Windows generated drag events
    System.Windows.DragEventArgs dragArgs = args as System.Windows.DragEventArgs;
    if (dragArgs == null) return;

    if (dragArgs.Data.GetDataPresent(DataFormats.FileDrop))
    {
        // user is trying to drop 'something' on the listbox
        FileInfo[] files = dragArgs.Data.GetData(DataFormats.FileDrop) as FileInfo[];
        AddImages(files);
    }

}
The second parameter to the ImagesDropped method is declared as an ‘EventArgs’ type because there are two distinct DragEventArgs classes. One provided by Silverlight 4 in the System.Windows namespace and one provided by the Silverlight Toolkit in the Microsoft.Windows namespace. In this particular case, the System.Windows version is going to be used, so we do a quick check to make sure we are ignoring any others [like those generated by reordering images in the list]. Then the code looks for any FileDrop data, and if found, pulls out the FileInfo instances and passes them to the ‘AddImages’ method. AddImages attempts to load the files as images, and if successful, adds them to the currently selected Category.
The other major new feature is the ability to drag an image from the ListBox onto another Category in the TreeView to move the image from one Category to another. Again, we’ll be leveraging the ‘like signature’ capabilities of the CallMethodAction, but in this case, we only care about Microsoft.Windows.DragEventArgs, i.e. those generated by the Silverlight Toolkit’s DragDropTarget classes. The ‘MoveImage’ method handles the movement of an image from one Category to another.
MainPageViewModel.cs:
public void MoveImage(object sender, EventArgs args)
{
    // only handle toolkit generated drag events
    Microsoft.Windows.DragEventArgs dragArgs = args as Microsoft.Windows.DragEventArgs;
    if (dragArgs == null) return;

    CategoryTreeViewItem destination = ((FrameworkElement)dragArgs.OriginalSource)
                                       .DataContext as CategoryTreeViewItem;
    if (destination == null) return;

    if (dragArgs.Data.GetDataPresent(typeof(ItemDragEventArgs)))
    {
        ItemDragEventArgs itemDragArgs = dragArgs.Data
                                         .GetData(typeof(ItemDragEventArgs)) as ItemDragEventArgs;
        if (itemDragArgs != null)
        {
            // the arguments inside the 'Data' member _should_ be a
            // Collection<Selection> instance
            Collection<Selection> items = itemDragArgs.Data as Collection<Selection>;
            if (items != null)
            {
                // now, each item in the collection should be an instance of the dragged item
                // NOTE:  We don't want to do ANYTHING with the TreeView related dropped items
                //        since the default behavior will handle that for us
                foreach (Selection item in items)
                {
                    if (item.Item is CategoryImageListItem)
                    {
                        CategoryImageListItem listItem = item.Item as CategoryImageListItem;
                        listItem.Parent.Images.Remove(listItem);
                        listItem.Parent.ReorderImages();

                        // now, add the item to the current drop target's list
                        listItem.Image.Category = destination.Category;
                        listItem.Parent = destination;
                        destination.Images.Add(listItem);
                        destination.ReorderImages();
                    }
                }
            }
        }
    }
}
Here we have to dig a little further to get at the information we need. First, we use the ‘OriginalSource’ property of the DragEventArgs to get the ‘source’ of the ‘Drop’ event. This turns out to be whatever control you happened to drop the image upon, but due to how we do our bindings in the XAML, we know that the DataContext of the thing we dropped upon will be the CategoryTreeViewItem class for that TreeViewItem instance. Just in case that isn’t true, we dump out, since we won’t be able to complete the drop operation without the destination Category [NOTE: If you drag and drop onto the hover button that appears, it will not work].
Once the destination is established, the code pulls out the ItemDragEventArgs instance which is encapsulated by the DragEventArgs class. The ItemDragEventArgs has a lot more information on it about the Drag event, including the source ListBox, whether or not the item has already been removed from the source, methods to remove the item from the source, etc. In our case, because we want to manage the ‘move’ ourselves, we only care about the ‘Data’ element, which in this case, is a Collection<> of Selection instances. Since we only want to move images, the code checks to see that the current Selection points to a CategoryImageListItem, and then proceeds to remove the item from its current parent and add it into the destination, reordering collections as necessary.
Summary
We’ve seen how you can enable Drag & Drop between two DragDropTargets that do not share the same DataContext type [or same structure in general]. I’ve shown you how to enable drag & drop file import from the desktop into the Silverlight application, and upload the result to the server [in the current case, through WCF RIA Services]. The application also shows how to enable Drag & Drop reordering of the ListBox and TreeView controls, including updating the underlying model appropriately [and automated backend update is a simple change], and a method for binding the SelectedItem property of a TreeView control.
I’ve glossed over a large portion of the application in this article, primarily those pieces handled in my previous two articles, and tried to place an emphasis on the core pieces that enable the new drag & drop capabilities. The drag & drop capabilities of Silverlight, especially when coupled with the Silverlight Toolkit are quite robust, but solutions to common problems do not always ‘jump out at you’ immediately. Specifically the dual DragEventArgs classes can be very confusing, leading to a number of ‘white screen’ exceptions as the Blend trigger cannot find the appropriately signatured method on your ViewModel.
Conclusion
I’m not certain that I’m crazy about using the ‘like signature’ methods on the ViewModel class, as it would seem to decrease testability of the ViewModel classes, but Commanding doesn’t really help here either, since you still need to glean information from the source view. In this case, it may actually be cleaner, and more testable, to put the code that captures the Drag & Drop events into the View code-behind and call the ViewModel methods with more explicit arguments. Since I don’t have a strong focus on testability in my articles up to this point, I won’t do that here, but it’s something to consider.
The complete source code can be found here: TreeViewMeetListBox-20100817.zip (1.1 MB)
NOTE: If you plan to run the example code, you’ll need to update the connection string in Web.config to point to your properly qualified database path (look for [[YOUR PATH HERE]]). Thanks for reading!