Silverlight TreeView Case Study - FAQ Maintenance - Part 1
Introduction
In my last few posts, I’ve talked about using Silverlight’s Drag & Drop support to make your client user experience [UX] better. In this series of articles, I’m going to try to pull together all three into a single coherent case study, maintaining a list of Frequently Asked Questions [FAQ]. The goal will be to provide a true ‘rich client’ experience, complete with Drag & Drop, dirty tracking, change notification and validation. A secondary objective will be to show how we can leverage Silverlight in the more controlled ‘admin’ scenario, and then leverage the same service(s) to provide a more standard HTML/Javascript derived front end.
User Scenario
The user desires to maintain a list of FAQ entries, organized by category. The same question must be able to exist within multiple categories, and the user must be able to control the order of the categories and questions within the category. Questions can also have multiple answers, and the user would like to be able to track and order these as well.
The user does not want end users to require a special client to view FAQ information, and needs to integrate the improved FAQ listing into their existing ASP.NET website with minimal effort. Ideally, JavaScript would not be required, and the application should provide graceful fallback to standard HTML when JavaScript is not enabled. JavaScript can be used to enhance the user experience for those with scripting enabled.
Approach
In this particular case, the goal of our solution is to provide the administrative users with a rich client UX, not the public internet users. Since the consumption of FAQ data is largely a passive activity, it does not benefit greatly from leveraging Silverlight on the client side, and a quality consumption method can be designed with minimal JavaScript. Administrative users, on the other hand, would benefit from something beyond the ‘standard admin web site’, and we can leverage Silverlight there to provide these users with a much better overall experience, without resorting to AJAX and the like that are normally required of these types of applications. In addition, once familiar with Silverlight development [and even when not familiar to a certain extent], Silverlight client development can be significantly faster than ASP.NET/AJAX/MVC/etc, especially when leveraging technologies like WCF RIA Services.
So, there are a few tasks that need to be performed, and I’ll list them out here in the order that we’ll tackle them:
- Build Data Model
- Expose Data Model via RIA Services
- Build Silverlight Admin Client
- Build ASP.NET page for FAQ display
Of course, step 3 is fairly involved, so I’ll break that down when we get there, but otherwise, the tasks are all fairly straightforward. So, let’s get started!
Step 1 – Build Data Model
In this case, I’m going to leverage Entity Framework 4 and a SQL Database File that’s in the App_Data folder of my website. So to do that we’ll add a new Models folder and place our FAQMaintenance.edmx file there. The data layout looks like this:
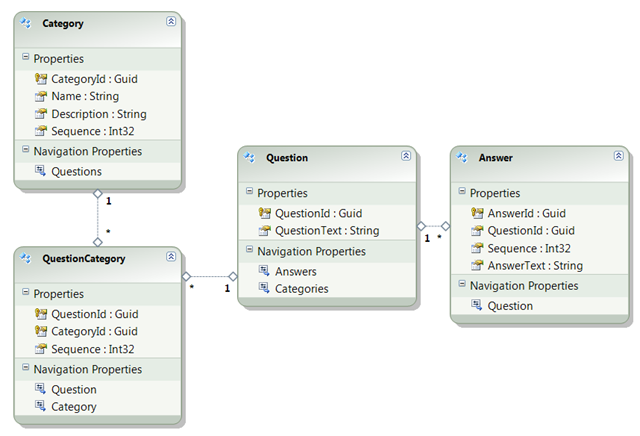
You’ll notice that we’ve captured all the data requirements above, Questions can live in multiple categories and have multiple answers, and we can control the sequence of categories, questions with the category and answers through the use of the ‘Sequence’ fields in the model.
Step 2 – Expose Data Model via WCF RIA Services
Once we’ve designed [and built] the web project, we can proceed to add the WCF RIA Services Domain Service to the web project. Following my recommendations from this post, I’ve created a ‘Services’ folder in the web project, with a ‘Metadata’ folder beneath to contain any Metadata overrides [this is where we’ll put the validation attributes]. I’ll also create a ‘.extensions’ class for my domain service to house any custom service methods [remembering to add ‘partial’ to the generated class]. It’s a fair amount of work to split all these things up in this fashion, but it will serve us well as we move forward and discover that we need to change things about the service.
NOTE: One thing I am not doing in this example, and which may be a good idea for larger applications, is creating a ‘Silverlight model’ which IS NOT the actual data model and providing a mapping layer between them. That’s too much complexity for this example, and not something I want to get into at this time.
There are a few changes we want to make here, first we’ll add some validation logic to the Categories, Questions and Answers. The rules are pretty basic, so I’ll just list them out here. I’ll be making the updates to the applicable ‘.metadata.cs’ files in each case. I won’t be adding any database defined limitations, because the RIA Services client code generation will handle that for me.
- Questions must have at least one answer
- Category name must be unique
- Question Text must be unique within a category.
I’ll also be updating the metadata files to mark the Question and Category objects to include the ‘Questions’ and ‘Answers’ navigation properties in the return values from service calls [with, strangely enough, the ‘IncludeAttribute’]. This will allow me to make a single service call and have all data about a Category [and Question] come back in one call, rather than making multiple calls to the service. I will split the retrieval of the data into ‘Questions’ and ‘Categories’ to demonstrate how multiple calls to the service can be handled, especially in cases where there is dependent data between the two.
I’ll also be leveraging the use of ‘shared’ classes for the Validation logic, and splitting the ‘Silverlight side’ and ‘Server side’ validation into separate code paths to keep the code together and share any that I can between the two. The domain service ‘.extensions’ file will contain two queries, one to get the category list [with associated QuestionCategory instances], and the other to retrieve Questions by category to facilitate lazy loading of TreeView content.
With all that work done, the solution looks like this and I am able to move onto building the actual administrative client application:
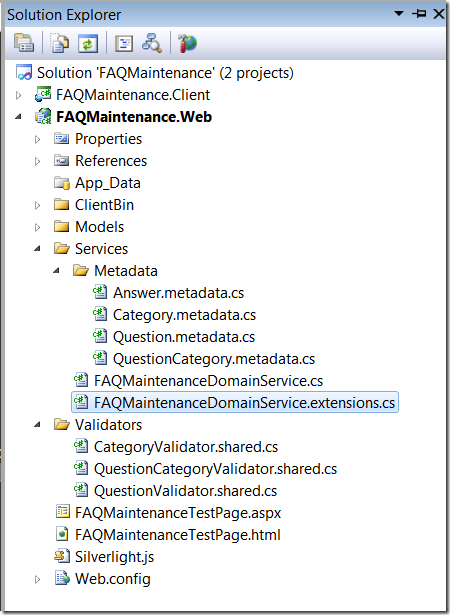 Server Solution Structure
Step 3 – Build Silverlight Client Administrative Application
This is where the rubber meets the road, and you’ll have to forgive me for glossing over the previous bits in an effort to get here quickly. Building the client application encompasses a number of steps, from building the basic layout to adding validation, dirty tracking/notification, etc. We’ll start by presenting a basic layout of our target UI, then walk through adding the various features one-by-one until we have a fully working client application.
User Interface Layout
The UI for this application is fairly simple. There are three ‘modes’, one with only the Category/Question tree shown, one in ‘Category’ edit mode, and the last in ‘Question’ edit mode. I’ll only picture the second two here [click the picture to see a full-size version].

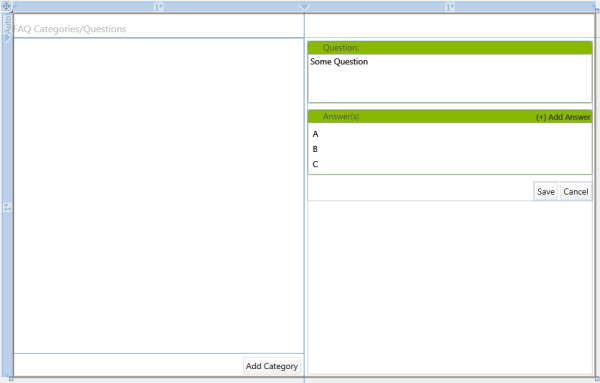
The TreeView on the left will be populated by a hierarchy of Category –> Question nodes, and the selected node will determine which ‘screen’ is displayed on the right-hand side of the application. The ‘Category Edit’ controls would show up if a Category was chosen, and the ‘Question Edit’ controls would appear when a Question is chosen. Otherwise, the UI is fairly straightforward.
ViewModel Basic Setup
Since we’re employing the MVVM pattern here, we need to provide a ViewModel class to populate the various UI fields. We’ll start by just populating the Categories in the list, which should give us a single-level TreeView of the Categories, and we should see the Category edit mode appear when we select one. The code to load the Categories is fairly simple, we’ll leverage the GetCategoryList() custom method on our WCF RIA Domain Service to ensure that we get back our ‘question links’ as well for later use.
To display the categories, we won’t use a direct binding to the Model classes, but rather we’ll create a CategoryTreeViewItem class which represents a Category in the tree. To facilitate some shared functionality for selection/expansion we’ll also create a simple ‘TreeViewItemBase’ class which represents a TreeViewItem ‘ViewModel’, then derive our CategoryTreeViewItem class from that. A BaseViewModel class provides simple things like OnPropertyChanged implementation and simple message windowing.
To hook our ViewModel up to the View, I’ll put code in the NavigatedTo event handler on the Page class that we implemented. This will represent the only code that we have in our View code-behind, and I use it to properly instantiate the ViewModel class based on incoming parameter values from the NavigationContext. I’ve found this to be cleaner than an ‘Initialize’ method on the ViewModel, and it allows us to use non-default constructors for ViewModels, something that’s very handy [but we won’t use in this example].
At this point, we have a ‘fully functional’ category maintenance application. Meaning I can load, add, save and delete categories [we’ll add our custom validation later]. I can even drag and drop the categories around for good measure. One thing I want to draw attention to is the use of the custom ‘TreeViewBoundSelectedItemBehavior’ custom behavior that allows us to bind the ‘SelectedTreeViewItem’ property to the TreeView class to properly display the edit window, this in turn is exposed via the ‘SelectedCategory’ property [and the SelectedQuestion property we’ll add later] to allow binding of the UI elements for editing.
Change Notification
The only thing that this user interface doesn’t do [for categories], is detect when you’ve changed something about a category and then clicked another item in the list. To implement that feature we’re going to turn to our ‘TreeViewItemBase’ class that I mentioned earlier. The entirety of the code for this class is produced below:
TreeViewItemBase.cs
namespace FAQMaintenance.Client.ViewModels
{
    public class TreeViewItemBase : BaseViewModel
    {
        private bool _isExpanded;
        public bool IsExpanded
        {
            get { return _isExpanded; }
            set
            {
                if (value != _isExpanded)
                {
                    _isExpanded = value;
                    if(!SuppressExpandedChanged) OnExpandedChanged();
                    OnPropertyChanged(() => IsExpanded);
                }
            }
        }

        internal bool SuppressExpandedChanged { get; set; }

        protected virtual void OnExpandedChanged()
        {

        }

        private bool _isSelected;
        public bool IsSelected
        {
            get { return _isSelected; }
            set
            {
                if (value != _isSelected)
                {
                    _isSelected = value;
                    if(!SuppressSelectedChanged) OnSelectedChanged();
                    OnPropertyChanged(() => IsSelected);
                }
            }
        }

        internal bool SuppressSelectedChanged { get; set; }

        protected virtual void OnSelectedChanged()
        {

        }
    }
}
The goal here is along the lines of this excellent post by Josh Smith on WPF TreeView interactions. This class is intended to handle the IsSelected/IsExpanded properties of the individual TreeViewItem classes and allow us to programmatically select items from the TreeView in code. So, why continue to use the custom behavior mentioned above? Primarily because I didn’t want to have to notify all the way up the ‘ViewModel’ tree that a selection had changed so that I could, in the end, do a property change notification on the SelectedCategory/SelectedQuestion properties on my main view model. Using the two together provides for a little bit cleaner code in the end [and yes, like all things, there are ‘many ways to skin the cat’].
Unfortunately, when we try to do as Josh suggests in our Silverlight XAML, we find that we cannot. In fact, Silverlight does NOT support bindings in the Style elements at all. The Silverlight XAML parser pukes on such references. Luckily for us, David Anson [aka Delay] has a ready solution in this blog post. Using the SetterValueBindingHelper allows us to do the bindings as we’d like and everything ‘just works’. The relevant XAML snippet is below:
FAQMaintenance.xaml
<sdk:TreeView.ItemContainerStyle>
    <Style BasedOn="{StaticResource DefaultTreeViewItemStyle}" TargetType="sdk:TreeViewItem">
        <!-- NOTE: This should work, but does not -->
        <!-- Setter Property="IsExpanded" Value="{Binding Path=IsExpanded, Mode=TwoWay}" / -->
        <!-- Setter Property="IsSelected" Value="{Binding Path=IsSelected, Mode=TwoWay}" / -->
        <!-- With Delay's SetterValueHelper -->
        <Setter Property="helpers:SetterValueBindingHelper.PropertyBinding">
            <Setter.Value>
                <helpers:SetterValueBindingHelper>
                    <helpers:SetterValueBindingHelper
                        Property="IsExpanded"
                        Binding="{Binding Path=IsExpanded, Mode=TwoWay}" />
                    <helpers:SetterValueBindingHelper
                        Property="IsSelected"
                        Binding="{Binding Path=IsSelected, Mode=TwoWay}" />
                </helpers:SetterValueBindingHelper>
            </Setter.Value>
        </Setter>
    </Style>
</sdk:TreeView.ItemContainerStyle>
Armed with the above code, we can now handle our ‘OnSelectedChanged’ events on the TreeViewItem(s) to detect that things have changed and that a save is required. If the save is not successful, we can jump back to the relevant TreeViewItem by setting our IsSelected property on the ViewModel and show the validation messages. Of course, Silverlight is asynchronous, so one area this solution falls down is if the save fails for the first item, and the user is midstream editing another item. If the second item also has validation errors the UI can get into an infinite ‘selection loop’, but we’ll ignore that edge case for this example. A simple fix would involve just setting the IsSelected back when they say ‘Yes’ to save changes and not providing an opportunity for the error. I’m not doing that here because following the user intention of switching TreeViewItems is more important [to me] than the edge case of dual-edits.
Drag & Drop Anomalies
Another issue that arises in our basic setup is that due to the above ‘edit detect’ code, dragging & dropping items in the TreeView can prove problematic. This is because the results of the various drop actions can cause interim changes to the state of our classes, primarily in the ‘Move’ scenario, and we know that we’re going to auto-submit those changes to the server once the drag operation completes. So, we need a way of suppressing these type of events during the move, which is where the TreeViewItemBase ‘SupressSelectedChanged’ property comes into play. During a move, we set this property to ‘true’, perform the move(s), submit the changes and turn the property back to ‘false’ to re-enable selection changed tracking.
When testing the user interface at this stage, you’ll notice that Categories can be ‘dragged into’ other categories, and when that happens, we lose track of them in our ViewModel and we can no longer see them on the screen. We need to provide a method of preventing categories from dropping into other categories. To handle this, we’ll introduce a handler for the TreeViewDragDropTarget’s Drop event, and explicitly handle the Drop to move the category around in the source list. This is a little more work than letting the eventing handle it, and if anyone knows of a better solution, please drop a note in the comments. The handler looks like this:
FAQMaintenanceViewModel.cs
public void TreeViewItemDropped(object sender, EventArgs args)
{

    // we just want Microsoft.Windows.DragEventArgs here
    Microsoft.Windows.DragEventArgs dragArgs = args as Microsoft.Windows.DragEventArgs;
    if (dragArgs == null) return;

    // determine what type of item we're dragging
    if (!dragArgs.Data.GetDataPresent(typeof(ItemDragEventArgs))) return;
    ItemDragEventArgs itemArgs = dragArgs.Data.GetData(typeof(ItemDragEventArgs)) as ItemDragEventArgs;

    Collection<Selection> itemsDragged = itemArgs.Data as Collection<Selection>;
    if (itemsDragged == null) return;

    // now, where are we going [target]?
    FrameworkElement element = dragArgs.OriginalSource as FrameworkElement;
    if (element == null '' element.DataContext == null) return; // we can't know

    /**NOTE:  For now, we need to handle drop events for categories directly
        *        so they don't get 'dragged' into each other, this won't be
        *        necessary once we start handling questions too...
        **/
    CategoryTreeViewItem catDragged = itemsDragged[0].Item as CategoryTreeViewItem;
    if (catDragged == null) return; // can't do anything about non-categories...

    CategoryTreeViewItem destination = element.DataContext as CategoryTreeViewItem;
    if (destination == null) return; // we're not dropping on a category

    itemArgs.RemoveDataFromDragSource();

    int insertionIndex = Categories.IndexOf(destination);

    if (itemArgs.DragDecoratorContentMouseOffset.Y >= (element.ActualHeight / 2))
    {
        insertionIndex++;
    }

    // place it in the source list at the index of the currently
    // selected item, so that it gets picked up instead of the
    // originally dragged item
    if (insertionIndex >= 0)
    {
        Categories.Insert(insertionIndex, catDragged);
    }
    else
    {
        Categories.Add(catDragged);
    }

    dragArgs.Handled = true;
}
If you read closely, you’ll see a comment about not needing to handle Category drags in the final version of the application. This is due to the HierarchicalDataTemplate’s ItemSource property being ‘unbound’ at this stage in the game. We’ve told the TreeView that we have hierarchical data, but we haven’t provided actual bound collections for the hierarchy. As a result, we need to prevent the TreeViewDragDropTarget from ‘helping’ us by making our data hierarchical. Once we add Question handling [in Part 2], that problem should go away on it’s own and we can get rid of this particular code.
At this point, category maintenance is complete, and in Part 2, we’ll move onto adding ‘Questions’ into the mix and hopefully get things finished up. A version of the application with just category maintenance in play can be found for download here:
FAQMaintenance-Part 1-20100826.zip (752.32 kb)
Summary – Part 1
In this article, we’ve started the process of creating a full-blown FAQ management application, complete with public and administrative functionality. Up to this point, we’ve covered the creation of the domain model, services and the start of the administrative client application. In Part 2, we’ll complete the administrative client application by adding Question management, and provide the public facing ASP.NET web page for viewing the FAQ information.
Thanks for reading!
UPDATE: Part 2 can be found here