Securing a GraphQL Server API with ASP.NET Core & Azure AD B2C - Part 5
Creating a Custom React UI
The Setup
In Part 1 of this blog series, I covered the process of standing up an API using GraphQL, GraphiQL and ASP.NET Core. Part 2 covered the process of setting up a new Azure AD B2C tenant and configuring it for user authentication. Part 3 introduced authentication and authorization of the GraphiQL application. Part 4 handled building the solution and deploying the infrastructure and code. Now I'll show how to consume the API we've created from within a custom React UI, using the power of the Microsoft Authentication Library (MSAL v2) and Apollo GraphQL.
The series assumes that you know basic GraphQL concepts, and does not cover building queries, mutations, etc except as they relate to or are effected by the particulars of the security implementation. I also assume you know your way around the Azure Portal and Azure DevOps. All series code will be made available on GitHub. The code referenced in this post can be found in the 'part-5' branch. I'll be using Visual Studio Code throughout the series, feel free to use the tool of your choice to manage your code.
Part 5 - Creating a Custom React UI
I want to start by letting you know I will -NOT- be walking you through the creation of the React application from empty folder to running application, there is simply too much code involved, and most of it isn't related to actually consuming the GraphQL API from the application. There isn't space, and I doubt I'd do as good a job of it as many of the other 'build your first React App' walkthroughs that already exist on the internet. In this post, I'll be focusing on how to connect your application to the Azure B2C infrastructure, and a way to architect your code to consume data from the GraphQL API that we created in the first portions of the series.
Getting off the ground
If you're following along, it may be easiest to clone the repository and switch over to the 'part-5' branch, I'll be calling out the specific areas of concern to glue the React front-end to our API.
git clone https://github.com/bengavin/graphql-aspnetcore-azureadb2c.git .
git checkout part-5
Now, fire up VS Code, and let's walk through the solution structure.
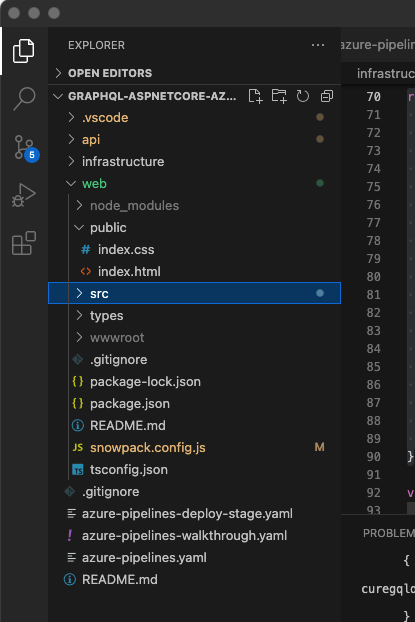 VS Code - React UI - Folder Structure
At a top level, the web folder contains a few critical pieces:
- public - The (static) files here will be served up from the root of the resulting web site
- src - This folder contains the bulk of the code for our solution, we'll look in more detail here momentarily
- types - TypeScript specific type definitions to help the TypeScript transpiler
- package.json - The standard NodeJS package configuration that calls out our dependencies
- snowpack.config.js - Configures the Snowpack tooling, which serves as our developer server and build tool
Drilling into the src folder, we get to most of our files of interest:
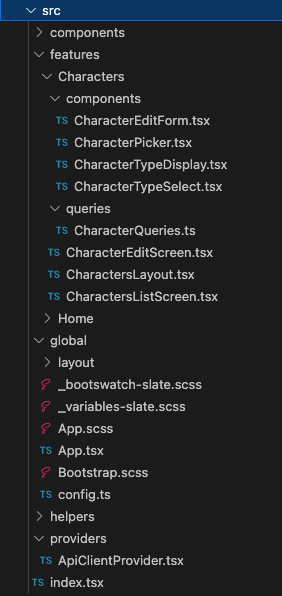 VS Code - React UI - src folder contents
- components - These are shared (non-feature specific components used by the app)
- features - The features exposed by the app
- <feature> - Folder containing the implementation of the named feature
- components - Feature specific components
- queries - The GraphQL query definitions and associated custom React hooks
- <feature> - Folder containing the implementation of the named feature
- global - Application wide implementation(s), including the main 'App' component and SASS stylesheets
- helpers - Common helper functionality
- providers - Common React Provider components used by the application
- index.tsx - The application entry point
Leveraging the Apollo GraphQL Client
Now that we have the basic application structure out of the way, let's look at the specific details to start using GraphQL in our application. In this application, we use the Apollo GraphQL library (npm install @apollo/client). We'll start by looking at the src/providers/ApiClientProvider.tsx component to see how this is leveraged.
// ApiClientProvider.tsx
import React, { PropsWithChildren } from "react";
// ...

import { ApolloClient, createHttpLink, InMemoryCache } from '@apollo/client';
import { setContext } from '@apollo/client/link/context';
import { ApolloProvider } from "@apollo/client/react";
import { keys } from "~global/config";

// ...

export type ApiClientProps = PropsWithChildren<{}>;

const ApiClientProvider = ({ children }: ApiClientProps): React.ReactElement => {
    // ...

    const httpLink = createHttpLink({
        uri: `${keys.API_BASE_URL}/graphql`,
    });

    const authLink = setContext(async (_, { headers }) => {
        // get the authentication token from our retrieved access token
        const token = await getAccessToken();

        // return the headers to the context so httpLink can read them
        return {
            headers: {
                ...headers,
                authorization: token ? `Bearer ${token}` : "",
            }
        }
    });

    const client = new ApolloClient({
        link: authLink.concat(httpLink),
        cache: new InMemoryCache({
            possibleTypes: {
                Character: ["Human", "Droid"]
            }
        })
    });

    return (
        <ApolloProvider client={client}>
            {children}
        </ApolloProvider>
    );
};
//...
In this snippet, we create a new instance of the 'ApolloClient' component and pass it into the ApolloProvider component. This exposes the Apollo Client infrastructure to everything contained by the provider, so it can be leveraged by our downstream React components to execute queries. To link this provider into our application, we update our src/index.tsx entry point to expose our ApiClientProvider to the entirety of the application.
// index.tsx
// ...
// Component
const AppProvider = () => (
    <MsalProvider instance={pca}>
        <ApiClientProvider>
            <App />
        </ApiClientProvider>
    </MsalProvider>
);

ReactDOM.render(<AppProvider />, document.getElementById("root"));

// ...
Once these bits are in place, we can then write some queries using this provider, for example, the query to get a list of characters:
// CharacterQueries.ts
import { gql, useMutation, useQuery } from "@apollo/client";

//...

const CHARACTER_CORE_FIELDS_FRAGMENT = gql`
fragment CoreFields on Character {
    id
    name
    alignment
    __typename
}`;

const CHARACTER_LIST_QUERY = gql`
${CHARACTER_CORE_FIELDS_FRAGMENT}
query characterList {
    characters {
        ... on Character {
            ...CoreFields
        }
        ... on Human {
            homePlanet
        }
        ... on Droid {
            primaryFunction
        }
    }
}
`;

export const useListQuery = () => {
    const {
        loading,
        error,
        data
    } = useQuery(CHARACTER_LIST_QUERY);

    return {
        loading,
        error,
        data
    };
};

// ...
As you can see, leveraging the provider to run a query is now as simple as using the Apollo Client's useQuery hook, which locates the active ApolloProvider and its associated ApolloClient to execute the query against the API and return the resulting data (or error, as the case may be).
Wrapping in Azure AD B2C Authentication
The GraphQL API we are consuming requires authentication, assuming we had a version of the application referencing only the Apollo Client, we'd quickly determine that running queries against the API constantly failed, with the underlying connection redirecting us over to Azure AD B2C for authentication. The Apollo Client itself doesn't understand how to manage that, so we will need to inject something into the request process to obtain an appropriate authentication token. This is where the Microsoft Authentication Library (MSAL v2) comes into play.
The MSAL v2 library for React comes in two parts, the @azure/msal-browser and @azure/msal-react components. These two parts come together to offer an in-browser authentication flow that follows security best practices and provides a rich UI for the user to authenticate within. Again, just like the Apollo Client, there is another React 'provider' that we inject into the application to handle these authentication concerns. If you looked closely at the previous snippets, you would have already seen some of the references to those hooks / providers, so we'll start at the application entry point in src/index.tsx:
// index.tsx
import React from "react";
import ReactDOM from "react-dom";

import { MsalProvider } from "@azure/msal-react";
import { Configuration, PublicClientApplication } from "@azure/msal-browser";

import { App } from "~global/App";
import { keys } from "~global/config";
import ApiClientProvider from "./providers/ApiClientProvider";

// MSAL configuration
const configuration: Configuration = {
    auth: {
        clientId: keys.B2C_CLIENT_ID,
        authority: keys.B2C_AUTHORITY,
        redirectUri: keys.B2C_REDIRECT_URI,
        knownAuthorities: keys.B2C_KNOWN_AUTHORITIES.split(',')
    }
};

const pca = new PublicClientApplication(configuration);

// Component
const AppProvider = () => (
    <MsalProvider instance={pca}>
        <ApiClientProvider>
            <App />
        </ApiClientProvider>
    </MsalProvider>
);

// ...
The PublicClientApplication is the class to use when authenticating from a SPA application like this, as it allows the use of the more secure 'Authorization Code w/ PKCE' flow that prevents any secrets from being stored in the application code and leverages secure storage on the client browser to prevent credential leakage. The configuration information in 'keys' pulls the non-secret app registration and supplies them to the MSAL infrastructure. We then create a MsalProvider component and hand it the configured application for use by any MSAL provided hooks. The actual configuration data gets baked into the application during the build process updates that I'll show later in the article.
Now we can look again at the ApiClientProvider to see how this new authentication provider links with the Apollo pieces we saw earlier:
import React, { PropsWithChildren } from "react";
import { useMsal } from "@azure/msal-react";
import { InteractionRequiredAuthError } from "@azure/msal-browser";

// ... Apollo imports

import { keys } from "~global/config";

// Setup required scopes for supporting the required GraphQL queries
export const loginSilentRequest = {
    scopes: keys.B2C_REQUEST_SCOPES.split(','),
};

export const loginRequest = {
    ...loginSilentRequest,
    prompt: "select_account",
};

export type ApiClientProps = PropsWithChildren<{}>;

const ApiClientProvider = ({ children }: ApiClientProps): React.ReactElement => {
    const { instance, accounts, inProgress } = useMsal();

    const getAccessToken = async () => {
        // NOTE: This isn't great, but the MSAL library will throw an exception
        //       if silent acquisition fails, so we need to handle that
        const account = accounts[0] ?? null;
        if (account && inProgress === "none") {
            try {
                const result = await instance.acquireTokenSilent({
                    ...loginSilentRequest,
                    account,
                });
                return result.accessToken;
            } catch (err) {
                if (err instanceof InteractionRequiredAuthError) {
                    // fallback to interaction when silent call fails
                    return instance.acquireTokenPopup(loginRequest);
                }
            }
        } else if (!account && inProgress === "none") {
            return instance.acquireTokenPopup(loginRequest);
        }
        return null;
    };

    // Apollo Code ...
};
// ...
Two things to note here, the first is that we're using the useMsal hook to leverage the provider we added above, and second that we see the GetAccessToken implementation that actually interacts with the MSAL v2 library to effect a login flow. The method first attempts to obtain a token without user interaction (via acquireTokenSilent), if this fails, then a method fires off a popup window to start the authentication flow (via acquireTokenPopup). The initial silent attempt is to capture those cases where authentication has already happened and we just need an access token for the current call. If you recall, this code is invoked during the setContext portion of the Apollo invocation pipeline and is awaited so the token is available for the call to the backend API. For this application, I've chosen to use a popup so that we can retain any current state that we have in the React application.
One other useful hook that's provided by MSAL is useIsAuthenticated. This hook simply returns a boolean to indicate whether or not a user has been authenticated in the current browser tab. I've used this in the src/global/App.tsx file to determine which routes are available to the current user:
// App.tsx
// ...
import { useIsAuthenticated } from "@azure/msal-react";
// ...
export const App = () => {
    const isAuthenticated = useIsAuthenticated();

    return (
        <Router>
            <Header />
            <main>
                {isAuthenticated ? <AuthenticatedRoutes /> : <UnauthenticatedRoutes />}
            </main>
        </Router>
    );
}
// ...
Lastly, I've leveraged a couple built-in components provided by MSAL which takes into account current authenticated state. The navigation header (in src/global/layout/Header.tsx) leverages these component templates to show/hide content based on authenticated state:
// Header.tsx
// ...

import {
  AuthenticatedTemplate,
  UnauthenticatedTemplate,
  useMsal,
} from "@azure/msal-react";

// ...

function Header() {
  //...

  return (
    <Navbar bg="primary" variant="dark" expand="md" className="py-1">
      <Navbar.Brand as={Link} to="/">
        Star Wars Demo
      </Navbar.Brand>
      <Navbar.Toggle />
      <Navbar.Collapse className="d-flex flex-row justify-content-between">
        <UnauthenticatedTemplate>
          {/* ... Stuff we should show Unauthenticated Users */}
        </UnauthenticatedTemplate>
        <AuthenticatedTemplate>
          {/* ... Stuff we should show to Authenticated Users */}
        </AuthenticatedTemplate>
      </Navbar.Collapse>
    </Navbar>
  );
}
// ...
API Updates
In order for our API to successfully process requests from both the GraphiQL front-end we built earlier and our new custom React UI, a few changes need to be made to the authentication / authorization pipeline in Startup.cs. I've made a number of updates to enable slightly richer API interactions than our Parts 1-4 API version would have supported, but I'll limit myself to going over the security updates here.
Enable multi-modal authentication
We need to continue to support the cookie + JWT based authentication that our GraphiQL front-end uses, while also supporting JWT authentication from an 'external' endpoint that houses our React UI. This involves updating the ASP.NET Core authN pipeline with some policies, and enabling CORS support so the browser can successfully make requests from an external (to the API) URL. To do this, we'll start in the ConfigureServices method:
// Startup.cs
// ...
        public void ConfigureServices(IServiceCollection services)
        {
            // ...

            // API level auth (Bearer Token)
            services.AddAuthentication(JwtBearerDefaults.AuthenticationScheme)
                    .AddMicrosoftIdentityWebApi(options =>
                    {
                        Configuration.GetSection("AzureB2C_Demo_API").Bind(options);
                        options.ForwardDefaultSelector = ctx => ctx.Request.Path.StartsWithSegments("/ui/graphiql") ? OpenIdConnectDefaults.AuthenticationScheme : null;
                    }, options =>
                    {
                        Configuration.GetSection("AzureB2C_Demo_API").Bind(options);
                    },
                    JwtBearerDefaults.AuthenticationScheme,
                    true);

            // ... web cookie auth setup

            services.AddCors(options => {
                options.AddDefaultPolicy(policy => {
                    policy.AllowCredentials()
                          .WithMethods(HttpMethods.Post, HttpMethods.Options)
                          .AllowAnyHeader()
                          .WithOrigins(Configuration.GetSection("Cors:AllowedOrigins").Get<string[]>());
                });
            });

            // ...

            // Enable both types of authentication/authorization
            services.AddAuthorization(options =>
            {
                var defaultAuthorizationPolicyBuilder = new AuthorizationPolicyBuilder(
                        JwtBearerDefaults.AuthenticationScheme,
                        OpenIdConnectDefaults.AuthenticationScheme)
                    .RequireAuthenticatedUser();
                options.DefaultPolicy = defaultAuthorizationPolicyBuilder.Build();
            });

            // ... GraphQL setup
        }
// ...
In order to enable proper JWT handling when there isn't also a cookie based authN context in play, we must replace our 'API' level authentication to instruct the pipeline to forward '/ui/graphiql' requests to the OpenIdConnect auth provider used by GraphiQL and to handle anything else via the JwtBearerToken auth provider. We then setup CORS support, which requires us to tell the pipeline where requests are allowed to come from. I've added a new appsettings.json configuration to support this (seen below), which we can override during our build process to supply the correct client source URIs. GraphQL uses POST for the actual queries and OPTIONS to support the CORS pre-flight checks, so we can disallow any other request types for external consumers. Lastly, we need to update the authorization pipeline to indicate that both a JWT Bearer token and OpenIdConnect cookies are supported as authentication methods during the authorization phase.
// appsettings.json
{
  // ...
  "Cors": {
    "AllowedOrigins": [
      "http://localhost:8080"
    ]
  }
}
The only other update we need is the Configure method, which just requires that we app.UseCors() just prior to setting up the routing:
// Startup.cs
// ...
        public void Configure(IApplicationBuilder app, IWebHostEnvironment env)
        {
            // ...

            app.UseCookiePolicy();

            app.UseCors();
            app.UseRouting();

            // ...
        }
// ...
Infrastructure Updates
Part 4 introduced a placeholder 'webapp' role for the React application, but there wasn't anything to deploy there at that time. Since React is a single-page application (SPA) framework, it doesn't require an Azure Web Site / App Service Plan to support it and we can leverage a different pair of Azure technologies to serve the HTML/CSS/JS files to clients without needing to add a server-side runtime to the mix. For this solution, we're going to leverage Storage Static Websites and Azure CDN to serve our pages. Doing this will require a couple minor updates to our Bicep playbook and 'webapp' role, so let's start with the playbook.
Playbook Updates
The playbook updates are fairly minor, really just accounting for the fact that we'll need to pass some storage account related details around (and output those details for the build script updates later). We also can remove the web app from the KeyVault access policies, as it doesn't need access to any secrets stored there.
// playbook.bicep
// ...

module webAppModule 'roles/webapp/webapp.bicep' = {
  scope: resourceGroup
  name: 'webAppModule'
  params: {
    application: application
    region: region
    stage: stage
    storageAccountName: baseModule.outputs.storageAccountName
    storageAccountStaticWebEndpoint: baseModule.outputs.storageAccountStaticWebsiteHost
  }
}

// ...

module keyVaultModule 'roles/keyvault/keyvault.bicep' = {
  scope: resourceGroup
  name: 'keyVaultModule'
  params: {
    apiAppName: apiAppModule.outputs.apiApp.properties.name
    application: application
    funcAppName: funcAppModule.outputs.funcApp.properties.name
    funcAppResourceGroup: funcResourceGroup.name
    region: region
    stage: stage
    existingSecrets: existingKeyVaultSecrets
  }
}

// Output created App Service information
output apiAppName string = apiAppModule.outputs.apiApp.properties.name
output webAppStorageAccountName string = webAppModule.outputs.websiteStorageAccountName
output webAppHostname string = webAppModule.outputs.websiteHostName
output funcAppName string = funcAppModule.outputs.funcApp.properties.name
The updated playbook visualization looks like this:
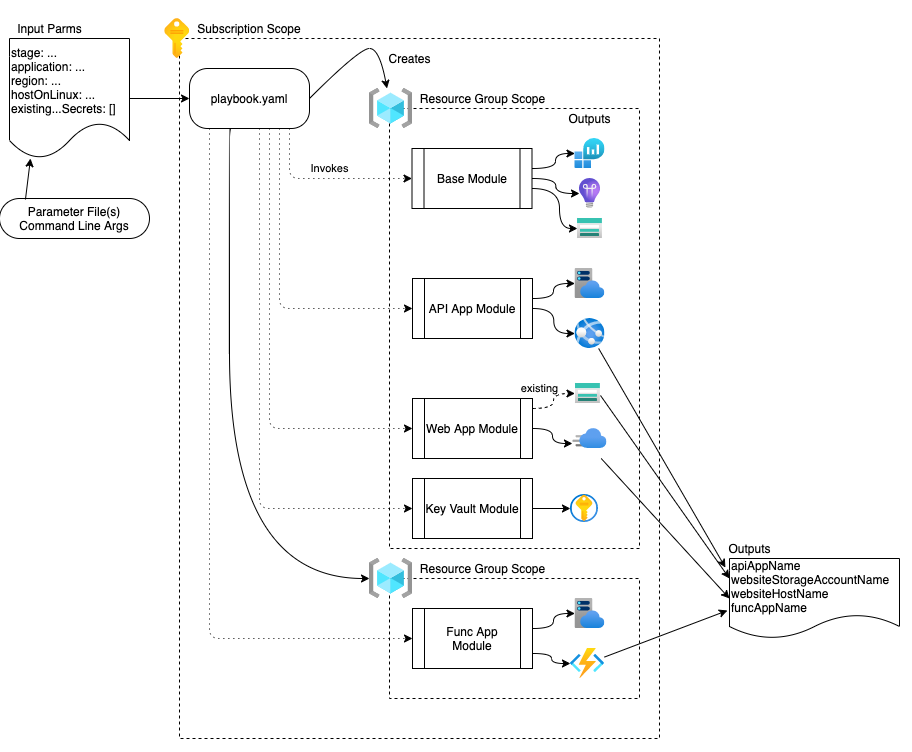 Bicep Playbook - Module and Resource Layout Visualization
Base Module Updates
The Storage Account is created as part of the base module, and Bicep works better when we're explicit about the particular bits we want to output from the module, so we'll make a couple minor updates here to send out the storage account name and primary web endpoint. We also want to convert the account to a 'read-access globally redundant' storage account, since our global CDN endpoint will read from it and we want to minimize Azure network costs.
NOTE: We could get the primary web endpoint later, but Bicep doesn't currently like accessing certain 'calculated/runtime' properties within the same template/module where they are created (a compiler error is thrown). As such, we'll write the values here as outputs, and then send the values in as input parameters to the webapp module to work around this issue
// base.bicep
// ...

// Storage Account
resource storageAccount 'Microsoft.Storage/storageAccounts@2021-02-01' = {
  name: 'stg${stage}${application}'
  location: region
  kind: 'StorageV2'
  sku: {
    name: 'Standard_RAGRS'
  }
  properties: {
    accessTier: 'Hot'
    allowBlobPublicAccess: true
    allowSharedKeyAccess: true
    supportsHttpsTrafficOnly: true
    networkAcls: {
      bypass: 'AzureServices'
      defaultAction: 'Allow'
      virtualNetworkRules: []
      ipRules: []
    }
  }
  tags: {
    environment: stage
    application: application
  }
}

// ...
output storageAccountName string = storageAccount.name
output storageAccountStaticWebsiteHost string = storageAccount.properties.primaryEndpoints.web
Web App Module Updates
The webapp module requires the most substantial updates, and I won't post them all here, but I will call out a couple gotchas that came up during the transition. First, the $web container needs to exist, so we reference the existing storage account and add the container there. Secondly, there is no Bicep (or ARM template) exposed method to set the appropriate 'toggles' on a storage account to enable static website hosting. This needs to be done via the Azure CLI / Powershell, which is handled by creating a new managed identity (with appropriate roles) and a deploymentScript resource:
// webapp.bicep
// ...
resource storageBlobs 'Microsoft.Storage/storageAccounts/blobServices@2021-04-01' existing = {
  name: '${storageAccountName}/default'
}

// ...

// The web container
resource webContainer 'Microsoft.Storage/storageAccounts/blobServices/containers@2021-04-01' = {
  name: '$web'
  parent: storageBlobs
  properties: {
    defaultEncryptionScope: '$account-encryption-key'
    denyEncryptionScopeOverride: false
    publicAccess: 'None'
  }
}

// Enable static website via Azure CLI
var storageAccountContributorRoleDefinitionId = subscriptionResourceId('Microsoft.Authorization/roleDefinitions', '17d1049b-9a84-46fb-8f53-869881c3d3ab') // as per https://docs.microsoft.com/en-us/azure/role-based-access-control/built-in-roles#:~:text=17d1049b-9a84-46fb-8f53-869881c3d3ab
var storageAccountStorageBlobDataContributorRoleDefinitionId = subscriptionResourceId('Microsoft.Authorization/roleDefinitions', 'ba92f5b4-2d11-453d-a403-e96b0029c9fe') // as per https://docs.microsoft.com/en-us/azure/role-based-access-control/built-in-roles#:~:text=ba92f5b4-2d11-453d-a403-e96b0029c9fe

var managedIdentityName = 'StorageStaticWebsiteEnabler'
resource managedIdentity 'Microsoft.ManagedIdentity/userAssignedIdentities@2018-11-30' = {
  name: managedIdentityName
  location: region
}

resource roleAssignmentContributor 'Microsoft.Authorization/roleAssignments@2020-04-01-preview' = {
  scope: storageAccount
  name: guid(resourceGroup().id, managedIdentity.id, storageAccountContributorRoleDefinitionId)
  properties: {
    roleDefinitionId: storageAccountContributorRoleDefinitionId
    principalId: managedIdentity.properties.principalId
    principalType: 'ServicePrincipal'
  }
}

resource roleAssignmentStorageBlobDataContributor 'Microsoft.Authorization/roleAssignments@2020-04-01-preview' = {
  scope: storageAccount
  name: guid(resourceGroup().id, managedIdentity.id, storageAccountStorageBlobDataContributorRoleDefinitionId)
  properties: {
    roleDefinitionId: storageAccountStorageBlobDataContributorRoleDefinitionId
    principalId: managedIdentity.properties.principalId
    principalType: 'ServicePrincipal'
  }
}

resource webScript 'Microsoft.Resources/deploymentScripts@2020-10-01' = {
  kind: 'AzureCLI'
  name: 'enableBlobStaticWeb'
  location: region
  identity: {
    type: 'UserAssigned'
    userAssignedIdentities: {
      '${managedIdentity.id}': {}
    }
  }
  dependsOn: [
    roleAssignmentContributor
    roleAssignmentStorageBlobDataContributor
  ]
  properties: {
    azCliVersion: '2.26.1'
    cleanupPreference: 'OnSuccess'
    scriptContent: 'az storage blob service-properties update --account-name ${storageAccount.name} --static-website --404-document index.html --index-document index.html'
    retentionInterval: 'PT4H'
  }
}
// ...
An important note here, in order for this to work properly, the user running the deployment script must have 'User Access Administrator' permissions to the subscription(s) that you will be deploying to. Visiting the subscription in Azure portal and clicking on the 'Access Control (IAM)' blade should show your current Service Connection principal listed as a 'Contributor'. Add the same Service Connection principal to the 'User Access Administrator' role to enable successful deployment by using the 'Add -> Add role assignment' dialog.
The only other piece I'll specifically call out here is that the storage account we're using requires HTTPS access, and the Azure CDN profile is specifically designed to allow both HTTP and HTTPS access. If left at this, any HTTP access would fail with a 'HTTP not allowed' error. This can be resolved by leveraging the new 'Rules Engine' feature of the Microsoft Standard CDN profile, via the 'deliveryPolicy' attribute (vs. the 'policies/ruleSets' and 'policies/rules' that other profiles use). The necessary rule looks like this:
// webapp.bicep
// ...
resource cdnEndpoint 'Microsoft.Cdn/profiles/endpoints@2020-09-01' = {
  name: 'web-${stage}-${application}'
  parent: cdnProfile
  location: 'global'
  tags: defaultTags
  dependsOn: [
    storageAccount
  ]
  properties: {
    originHostHeader: staticWebsiteHostName
    // ... compression related props
    isHttpAllowed: true
    isHttpsAllowed: true
    queryStringCachingBehavior: 'IgnoreQueryString'
    origins: [
      {
        name: endpointOriginName
        properties: originProperties
      }
    ]
    deliveryPolicy: {
      rules: [
        {
          name: 'EnforceHTTPS'
          order: 1
          conditions: [
            {
              name: 'RequestScheme'
              parameters: {
                '@odata.type': '#Microsoft.Azure.Cdn.Models.DeliveryRuleRequestSchemeConditionParameters'
                operator: 'Equal'
                matchValues: [
                  'HTTP'
                ]
              }
            }
          ]
          actions: [
            {
              name: 'UrlRedirect'
              parameters: {
                '@odata.type': '#Microsoft.Azure.Cdn.Models.DeliveryRuleUrlRedirectActionParameters'
                redirectType: 'Found'
                destinationProtocol: 'Https'
              }
            }
          ]
        }
      ]
    }
  }
}

// ...
Once the infrastructure files are in place, we can move on to the required build/deployment updates.
Build Pipeline Updates
The build pipeline already handles installing the infrastructure via the Bicep files we just updated, and it handles building and deploying the API components to the appropriate location. Now, we need to add support for building and deploying the React UI updates. Since we want the same actions to occur in every environment, we'll be updating the azure-pipelines-deploy-stage.yaml file. The process is also getting complex enough that putting everything into one job no longer makes sense, so we'll split the existing DeployEnvironmentJob job into 4 pieces:
# azure-pipelines-deploy-stage.yaml
# All parameters are required
parameters:
  - name: serviceConnection
    type: string
  - name: environment
    type: string

jobs:
- job: DeployEnvironmentJob
  displayName: Deploy ${{ parameters.environment }} environment
  steps:
  - task: AzureCLI@2
    name: BicepDeploy
    displayName: Deploy Bicep template
    # ...

- job: BuildWebJob
  displayName: Build Web (${{ parameters.environment }})
  dependsOn: DeployEnvironmentJob
  # ...

- job: DeployApiJob
  displayName: Deploy API (${{ parameters.environment }})
  dependsOn: DeployEnvironmentJob
  # ...

- job: DeployWebJob
  displayName: Deploy Web (${{ parameters.environment }})
  dependsOn:
  - DeployEnvironmentJob
  - BuildWebJob
  # ...
A couple things to notice here, one is that we've introduced dependencies between our jobs to ensure that they are executed in the appropriate order. Second, we've given the Bicep deployment task a name. The reason we do this is to allow us to reference the output variables from this job in other jobs within the YAML file. Without this, the output variables are 'lost in the ether' and inaccessible from the outside. So, with those things in mind, let's look in detail at the new BuildWebJob.
Building the React App
Good news, our use of the Snowpack tooling makes this update easy:
# azure-pipelines-deploy-stage.yaml
# ...
- job: BuildWebJob
  displayName: Build Web (${{ parameters.environment }})
  dependsOn: DeployEnvironmentJob
  variables:
    webAppName: $[ dependencies.DeployEnvironmentJob.outputs['BicepDeploy.webAppHostname'] ]
  steps:
  - task: CmdLine@2
    displayName: 'Restore Web Packages'
    inputs:
      workingDirectory: 'web'
      script: |
        echo "Restoring NPM packages..."
        npm install

  - task: CmdLine@2
    displayName: 'Snowpack Build'
    env:
      SNOWPACK_PUBLIC_API_BASE_URL: '$(GraphiQL.BaseUri)'
      SNOWPACK_PUBLIC_ENV: '${{ upper(parameters.environment) }}'
      SNOWPACK_PUBLIC_B2C_CLIENT_ID: '$(Snowpack.B2C.ClientId)'
      SNOWPACK_PUBLIC_B2C_AUTHORITY: '$(Snowpack.B2C.Authority)'
      SNOWPACK_PUBLIC_B2C_REDIRECT_URI: 'https://$(webAppName)/blank.html'
      SNOWPACK_PUBLIC_B2C_KNOWN_AUTHORITIES: '$(Snowpack.B2C.KnownAuthorities)'
      SNOWPACK_PUBLIC_B2C_REQUEST_SCOPES: '$(Snowpack.B2C.RequestScopes)'
    inputs:
      workingDirectory: 'web'
      script: |
        echo "Building for Deployment..."
        npx snowpack build

  - task: PublishPipelineArtifact@1
    displayName: Publish Web package to pipeline
    inputs:
      targetPath: 'web/wwwroot'
      artifact: 'WebFiles'
      publishLocation: 'pipeline'
# ...
Here, the SPA application needs to have different keys values installed for different environments, so we pass those into the build process as environment variables. We then take the resulting wwwroot folder and publish it into the build pipeline for later use. Here you can also see the use of the dependsOn and runtime variable resolution across dependencies. We grab part of the output from the Bicep template and use it to set our redirect URL that Azure AD B2C will use when access from this application. The new variables need to be added to our Library variable group as well (for each destination environment):
- Snowpack.B2C.ClientId - <B2C App Registration - Application (Client) Id>
- Snowpack.B2C.Authority - https://<B2C Organization>.b2clogin.com/<B2C Organization>.onmicrosoft.com/<B2C User Flow Id>
- Snowpack.B2C.KnownAuthorities - <B2C Organization>.b2clogin.com
- Snowpack.B2C.RequestScopes - <API Application ID URI>/character:read,<API Application ID URI>/character:write
- Cors.AllowedOrigins - this one isn't directly applicable here, but has the allowed client origins in JSON array notation (e.g. ["https://web-test-securegqldemo.azureedge.net","http://web-test-securegqldemo.azureedge.net"])
Since we're talking about B2C configuration application settings, this seems like a good time to mention a manual update we will need to make within Azure B2C. In order for our newly deployed React UI to interface with the B2C authentication process, we need to add an authorized 'SPA' redirect URI. Jump out to the App Registration for the Demo UI (or create a new one to represent the React app if you'd like) and add a new 'SPA' redirect URI that points to your app (e.g. https://web-test-securegqldemo.azureedge.net/blank.html). There are screenshots of the process that we used to setup GraphiQL in Part 2 if you need to see what that looks like.
NOTE: Here, I've opted to put the allowed origins as a build-time configuration, primarily to avoid introducing a dependency between the webapp Bicep module and the apiapp Bicep module, since each side requires the URIs from the other. This value can be overridden / supplied in Key Vault, if desired, to break the dependency and include it as part of the Bicep infrastructure code.
Publishing the React App
As I mentioned earlier, we're publishing this via Azure CDN from a Storage Static Website. In practical terms, that means we now need to copy our files out to BLOB storage so they can be picked up by the CDN. We'll leverage the Azure CLI to do this:
# azure-pipelines-deploy-stage.yaml
# ...
- job: DeployWebJob
  displayName: Deploy Web (${{ parameters.environment }})
  dependsOn:
  - DeployEnvironmentJob
  - BuildWebJob
  variables:
    storageAccountName: $[ dependencies.DeployEnvironmentJob.outputs['BicepDeploy.webAppStorageAccountName'] ]
  steps:
  - task: DownloadPipelineArtifact@2
    displayName: Download Web Package
    inputs:
      buildType: 'current'
      artifactName: WebFiles
      targetPath: '$(System.ArtifactsDirectory)/web'

  - task: AzureCLI@2
    displayName: "Azure CLI - Copy Web to BLOB storage"
    inputs:
      azureSubscription: ${{ parameters.serviceConnection }}
      scriptType: 'bash'
      scriptLocation: 'inlineScript'
      inlineScript: 'az storage blob upload-batch -d \$web -s $(System.ArtifactsDirectory)/web --account-name $(storageAccountName)'
We first grab the published Web artifact from the pipeline, then use the CLI to do a batch upload to BLOB storage. That's it! With all these pieces in place, running the pipeline should result in our new React UI being published and available for use.
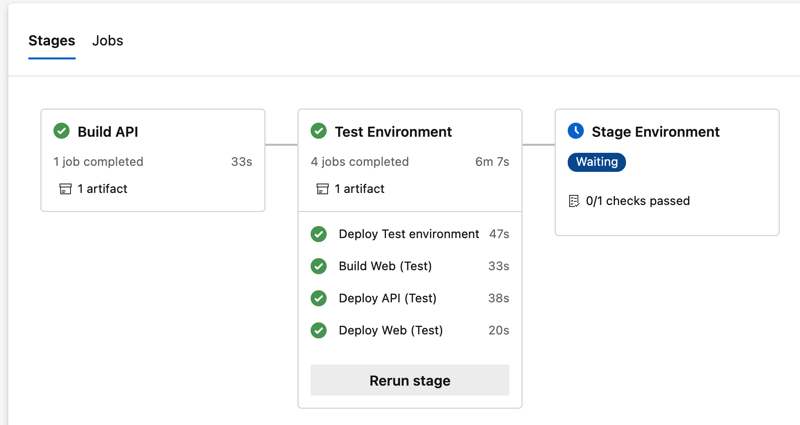 Azure DevOps - Pipelines - Run - Test Environment Successfully Deployed
The App In Action
Success! We have a running app, delivered via Azure CDN that uses our GraphQL API to manage our list of Star Wars characters. Feel free to dig into the code and tweak things to get a feel for using a GraphQL API from with React. I think you'll find it's a very pleasant experience!
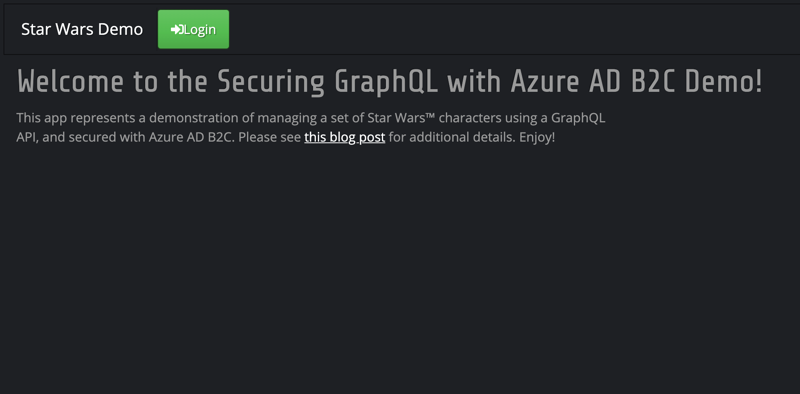 Star Wars React - Home
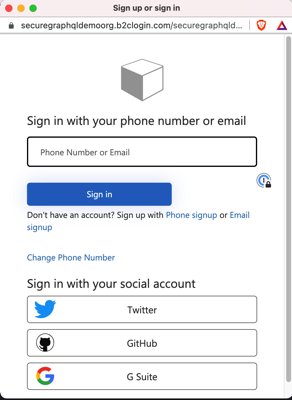 Star Wars React - Login
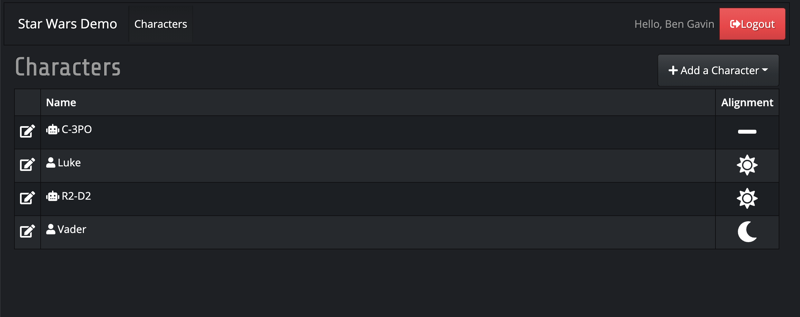 Star Wars React - Character List
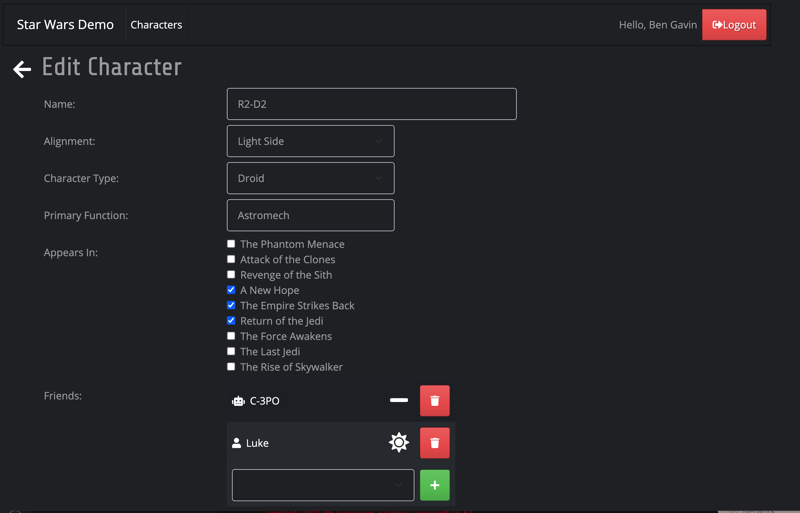 Star Wars React - Edit Character
Wrap Up
In this post we created a React UI to handle user login, basic character listing and character creation. We used the Apollo Client and MSAL v2 libraries to easily consume our existing GraphQL API and B2C tenant respectively. Lastly, we saw how to update our existing Bicep templates to accommodate the new infrastructure requirements and how to update the build scripts to deploy the new app. The code is available here (in the part-5 branch) if you're interested.
Our secured GraphQL API has now been successfully secured and deployed, and we've created a custom UI to manage the characters. That wraps up the series, thanks for following along and I hope you learned something new! See you next time!
- Part 1 - Create the API
- Part 2 - Configuring Azure Active Directory B2C
- Part 3 - Integrating the GraphQL Server API with Azure AD B2C
- Part 4 - Automating Build & Deployment to Azure App Service
- Part 5 - Consuming the Secured GraphQL API from a React App <== You're here!
Until then, happy coding!
Credits
I want to thank my colleagues at Core BTS for all their assistance in the preparation of this post. Their technical expertise and willingness to share that knowledge is truly inspiring. Specifically, I'd like to thank Andrew Petersen, Tim Miller and Eric Grover for their technical reviews and feedback.
It goes without saying that the internet is a hugely helpful resource, and I couldn't possibly mention all the various posts, blogs, documentation, etc that I visited in preparation of this series. I did want to specifically call out the excellent work that Microsoft has done with their 'Quick Start' templates. The one I pulled an excerpt from for this post is Azure Quick Start Templates - Storage Static Website, but there are loads of others out there to help you get started with Bicep.