Securing a GraphQL Server API with ASP.NET Core & Azure AD B2C - Part 3
Integrating the GraphQL Server API with Azure AD B2C
The Setup
In Part 1 of this blog series, I covered the process of standing up an API using GraphQL, GraphiQL and ASP.NET Core. Part 2 covered the process of setting up a new Azure AD B2C tenant and configuring it for user authentication. Now that those two pieces are in place, I'll show how to secure the API using Azure AD B2C. Future posts will discuss how to get the solution built and deployed to an Azure App Service using Azure DevOps pipelines. Finally, we'll take a look at how to integrate the newly secured API with a React App to customize the user experience.
The series assumes that you know basic GraphQL concepts, and does not cover building queries, mutations, etc except as they relate to or are effected by the particulars of the security implementation. I also assume you know your way around the Azure Portal and Azure DevOps. All series code will be made available on GitHub. I'll be using Visual Studio Code throughout the series, feel free to use the tool of your choice to manage your code.
Part 3 - Integrating the GraphQL Server API with Azure AD B2C
Integrating your API with Azure B2C is much easier than it once was, but there are still a few pitfalls to be aware of. The procedure that I'll walk through here is something that has worked for me, but there may be newer and better ways available in the future as Microsoft improves their integration packages. There are certainly a few places that the solution proposed feels like a bit of a hack, and if you know of better solutions, please reach out and I'll update the post accordingly. Before digging into the code, let's take a short step back and introduce the overall flow of the system.
High Level Concepts
The following diagram follows the high level user experience when a new user attempts to access your (soon to be secured) GraphiQL user interface.
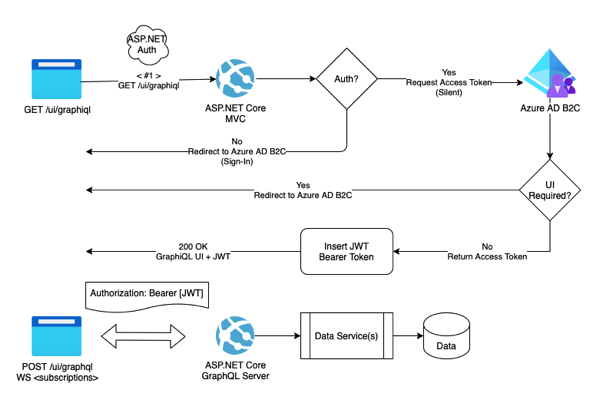 Azure AD B2C - Security Flow
Upon access to the GraphiQL route (/ui/graphiql), ASP.NET Core verifies that the user is authenticated. If not, it proceeds to redirect the user to the Azure AD infrastructure for sign-in. This is handled with ASP.NET Cookie based authentication, and in the sample, uses a simple in-memory cache for storing user authentication details. If the user is logged in already, then the system attempts to obtain an access token for the scopes requested by our UI application (as a JSON Web Token, or JWT). Depending on the state of the system, this can be resolved with a 'Silent' token access request, or it may require presenting a 'UI' to the user for consent/confirmation. In our simple case, there is no consent UI created, and one isn't provided out of the box in Azure AD B2C, so there is no 'UI' per-se, but the browser does redirect through the Azure AD B2C infrastructure for these 'UI' requests. In the end, a JWT is provided to us by Azure AD B2C, included in the GraphiQL headers and then presented on subsequent requests to the server. This JWT is then validated and used to access user-specific data within our data store.
A few more packages and prep work
In order to support the code we'll be adding, we need to add a few more packages in our project:
- GraphQL.Authorization
- GraphQL.Server.Authorization.AspNetCore
- Microsoft.AspNetCore.Authentication.OpenIdConnect
- Microsoft.Identity.Web
- Microsoft.Identity.Web.UI
We can also remove the following package, as the default solution doesn't support our use case:
- GraphQL.Server.Ui.GraphiQL
Alright, with those package changes in place, it's time to start wiring things together.
Adding ASP.NET Authentication
We have two types of Authentication to manage for this application. One for the API (using a Bearer token in the Authorization header) and one for the UI (Cookie based, with In Memory token store). Both are provided by the packages we added above, so let's open up Startup.cs and add a few lines of code. First, we need to introduce a constructor and configuration property so we can access the configuration during later startup code. The IConfiguration instance is one of the few 'things' that are handled out of the box by ASP.NET Core in the context of the Startup class.
    public Startup(IConfiguration configuration)
    {
        Configuration = configuration;
    }

    public IConfiguration Configuration { get; }
We then need to wire up the two types of authentication. Add this code inside the ConfigureServices(...) method, just after the 'Application Services' in the existing Startup.cs class:
    // API level auth (Bearer Token)
    services.AddMicrosoftIdentityWebApiAuthentication(
        Configuration,
        "AzureB2C-Demo-API",
        JwtBearerDefaults.AuthenticationScheme);

    // UI level auth (Cookie)
    services.Configure<CookiePolicyOptions>(options =>
    {
        // This lambda determines whether user consent for non-essential cookies is needed for a given request.
        options.CheckConsentNeeded = context => true;
        options.MinimumSameSitePolicy = SameSiteMode.Unspecified;
        // Handling SameSite cookie according to https://docs.microsoft.com/en-us/aspnet/core/security/samesite?view=aspnetcore-3.1
        options.HandleSameSiteCookieCompatibility();
    });

    services.AddMicrosoftIdentityWebAppAuthentication(
                Configuration,
                "AzureB2C-Demo-UI",
                OpenIdConnectDefaults.AuthenticationScheme)
            .EnableTokenAcquisitionToCallDownstreamApi()
            .AddInMemoryTokenCaches();

    services.AddControllersWithViews()
            .AddMicrosoftIdentityUI();
    services.AddRazorPages();

    services.AddOptions();
    services.Configure<OpenIdConnectOptions>(Configuration.GetSection("AzureB2C-Demo-UI"));
Then, let's add the associated updates to the Configure(...) method:
    app.UseCookiePolicy();

    app.UseRouting(); // this was here before

    app.UseAuthentication();
... and inside the services.UseEndpoints(...) call:
    // GraphiQL [comment or remove, we provide this ourselves now]
    //endpoints.MapGraphQLGraphiQL();

    endpoints.MapControllers();
    endpoints.MapRazorPages();
Ok, at this point, we have configured the two types of authentication and removed the default GraphiQL user interface. Now we need to add the associated configuration entries to appsettings.json to connect with our Azure AD B2C instance. The 'API' section has data from the API App Registration in Azure Portal, and the 'UI' section has data from the UI App Registration.
{
  // ...
  "AzureB2C-Demo-API": {
    "Instance": "https://securegraphqldemoorg.b2clogin.com/tfp/",
    "ClientId": "<Client / Application Id from Azure Portal>",
    "Domain": "securegraphqldemoorg.onmicrosoft.com",
    "SignUpSignInPolicyId": "b2c_1_susi",
    "SignedOutCallbackPath": "/signout/b2c_1_susi"
  },
  "AzureB2C-Demo-UI": {
    "Instance": "https://securegraphqldemoorg.b2clogin.com",
    "ClientId": "<Client / Application Id from Azure Portal>",
    "Domain": "securegraphqldemoorg.onmicrosoft.com",
    "SignedOutCallbackPath": "/signout/b2c_1_reset",
    "SignUpSignInPolicyId": "b2c_1_susi",
    /* Optional profile editing policy */
    "EditProfilePolicyId": "b2c_1_edit",
    "ClientSecret": "<Client Secret from App Registration>"
  },
  // ...
}
Now, the application should compile (subject to adding required using statements), but won't yet run, as we've taken away the GraphiQL UI, so there's nothing to show, and we haven't yet enforced anything beyond initial sign-up/sign-in.
Adding our version of GraphiQL
To enable authenticated GraphiQL support, we're going to have to set aside the out-of-box GraphiQL integration, as it doesn't properly handle credential passing or provide hooks for us to get our access token into the client browser. To kickstart that effort, we're going to work from the single-page example provided by the GraphiQL maintainers located here. Copy the HTML from that page and put it into the project under Views\Graphiql\Index.cshtml. We're then going to make a few minor tweaks to the page to link it with our access token.
To start, find the graphQLFetcher function and replace it with this version (on or around line 50):
  function graphQLFetcher(graphQLParams) {
      return fetch('@Model.GraphQLEndPoint', {
                method: 'post',
                headers: @Model.Headers,
                body: JSON.stringify(graphQLParams),
                credentials: 'include',
      }).then(function (response) {
          return response.json().catch(function () {
              return response.text();
          });
      });
  }
Then find the GraphiQL render properties and replace them with these (on or around line 63):
{
  fetcher: graphQLFetcher,
  defaultSecondaryEditorOpen: true,
  defaultQuery: `@Model.DefaultQuery`
}
Alright, with those updates in place, it's now time to implement the controller that hooks the GraphiQL user interface with the Azure AD B2C access token. Create a new file under Controllers\GraphiqlController.cs. The implementation should look like this:
namespace StarWars.API.Controllers
{
    [Authorize(AuthenticationSchemes = OpenIdConnectDefaults.AuthenticationScheme)]
    [AuthorizeForScopes(ScopeKeySection = "GraphiQL:ApiScopes")]
    public class GraphiqlController : Controller
    {
        private readonly IConfiguration _configuration;
        private readonly ITokenAcquisition _tokens;

        public class GraphiqlViewModel
        {
            public string GraphQLEndPoint { get; set; }
            public HtmlString DefaultQuery { get; set; }
            public HtmlString Headers { get; set; }
        }

        public GraphiqlController(IConfiguration configuration, ITokenAcquisition tokens)
        {
            _configuration = configuration;
            _tokens = tokens;
        }

        [Route("ui/graphiql")]
        [HttpGet]
        public async Task<IActionResult> Index()
        {
            var accessToken = await _tokens.GetAccessTokenForUserAsync(
                                (_configuration["GraphiQL:ApiScopes"] ?? string.Empty)
                                .Split(new [] { ' ', ',' }));

            return View(new GraphiqlViewModel
            {
                GraphQLEndPoint = $"{_configuration["GraphiQL:BaseUri"]}/graphql",
                DefaultQuery = new HtmlString("query getHeroes {\n  hero {\n    id\n    name\n  }\n}"),
                Headers = new HtmlString(JsonSerializer.Serialize<object>(new Dictionary<string, string>()
                {
                    { "Accept", "application/json" },
                    { "Content-Type", "application/json" },
                    { "Authorization", $"Bearer {accessToken}" }
                }))
            });
        }
    }
}
Lastly, add the configuration entries to appsettings.json (NOTE: The API scopes listed below should be the fully-qualified variant):
{
  //...
  "GraphiQL": {
    "ApiScopes": "https://securegraphqldemoorg.onmicrosoft.com/starwarsapi/character:read https://securegraphqldemoorg.onmicrosoft.com/starwarsapi/character:write",
    "BaseUri": "https://localhost:5001"
  },
  //...
}
Alright, again, build should work, but we're still missing the GraphQL authorization pieces. Let's add those next.
Adding Authorization
Authentication, in and of itself isn't terribly useful beyond auditing what happens in your system, and often the authentication process won't be triggered until -something- decides that the user needs to be authorized to see an area of the application. There will be a reasonable amount of code, so let's add an folder in the api project called Security. Within there, we'll add some constants, extension methods, etc to support our implementation.
ApiScope.cs - This is the 'API side' version of the client scopes
  public static class ApiScope
  {
      public static readonly string CharacterRead = "character:read";
      public static readonly string CharacterWrite = "character:write";
  }
ClientApiScope.cs - This is the 'UI side' version of the client scopes
  public static class ClientApiScope
  {
      public static readonly string CharacterRead = "https://securegraphqldemoorg.onmicrosoft.com/starwarsapi/character:read";
      public static readonly string CharacterWrite = "https://securegraphqldemoorg.onmicrosoft.com/starwarsapi/character:write";
  }
Policies.cs - These define the names of our eventual GraphQL authorization policies
  public static class Policies
  {
      public static readonly string AuthorizedUser = "AuthorizedUserPolicy";
      public static readonly string CharacterAccess = "CharacterAccessPolicy";
      public static readonly string CharacterWriteAccess = "CharacterWriteAccessPolicy";
  }
SecurityExtensions.cs - Some extension methods we'll use during policy definition and user context setup
    public static class SecurityExtensions
    {
        private static string[] ScopeClaimTypes = new string[] { ClaimConstants.Scope, ClaimConstants.Scp };

        public static bool HasAnyScopeClaim(this ClaimsPrincipal user, params string[] scopes)
        {
            var scopeClaims = user.FindAll(c => ScopeClaimTypes.Contains(c.Type, StringComparer.OrdinalIgnoreCase));
            var claimedScopes = scopeClaims.SelectMany(c => c.Value?.Split(new[] { ' ' }))
                                           .ToList();

            return scopes.Any(s => claimedScopes.Contains(s, StringComparer.OrdinalIgnoreCase));
        }

        public static AuthorizationPolicyBuilder RequireScopeClaim(this AuthorizationPolicyBuilder builder, params string[] scopes) =>
            builder.RequireAssertion(context => context.User.HasAnyScopeClaim(scopes));
    }
The library we're using for our GraphQL server supports adding authorization checks to various portions of the schema, so let's light up that functionality now. To start, we'll tweak our GraphQL setup in ConfigureServices():
  services.AddScoped<GraphQLUserContextBuilder>();
  services.AddGraphQL() // this was here before...
          .AddUserContextBuilder(async context =>
          {
              // This needs to be done here, as the builder needs Scoped services
              // and the baseline generic .AddUserContextBuilder puts things
              // in Singleton scope...
              var builder = context.RequestServices.GetService<GraphQLUserContextBuilder>();
              return (await builder.BuildUserContext(context)) as GraphQLUserContext;
          })
          .AddGraphQLAuthorization((options) =>
          {
              options.AddPolicy(Policies.AuthorizedUser, _ => _.RequireAuthenticatedUser());
              options.AddPolicy(Policies.CharacterAccess, _ => _.RequireScopeClaim(ApiScope.CharacterRead, ApiScope.CharacterWrite));
              options.AddPolicy(Policies.CharacterWriteAccess, _ => _.RequireScopeClaim(ApiScope.CharacterWrite));
          })
          //... the previous stuff
What we've done here is tell GraphQL to provide a user context to the pipeline, which is then made accessible to our schema objects. To support this, we need to add a couple more classes to our Security folder, to handle this user context construction.
GraphQLUserContext.cs - User context and context builder to provide user data to GraphQL pipeline
  public class GraphQLUserContextBuilder : IUserContextBuilder
  {
      private readonly ITokenAcquisition _tokenProvider;

      public GraphQLUserContextBuilder(ITokenAcquisition tokenProvider)
      {
          _tokenProvider = tokenProvider;
      }

      public async Task<IDictionary<string, object>> BuildUserContext(HttpContext httpContext)
      {
          if (!httpContext.User.HasAnyScopeClaim(
              ClientApiScope.CharacterRead,
              ClientApiScope.CharacterWrite,
              ApiScope.CharacterWrite,
              ApiScope.CharacterRead))
          {
              // Now, look to see if there is Bearer token auth available
              var authResult = await httpContext.AuthenticateAsync(JwtBearerDefaults.AuthenticationScheme);
              if (authResult.Succeeded)
              {
                  httpContext.User = authResult.Principal;
              }
              else
              {
                  // we need to obtain an access token with appropriate scopes (this -will- normally fail, but try anyway)
                  var accessToken = await _tokenProvider.GetAccessTokenForUserAsync(new [] {
                      ClientApiScope.CharacterRead,
                      ClientApiScope.CharacterWrite
                  });

                  // Now, update the current context user to be based on this new token
                  var newUser = GetBearerTokenPrincipal(accessToken, httpContext.User);
                  httpContext.User = newUser;
              }
          }

          return new GraphQLUserContext(httpContext.User);
      }

      private ClaimsPrincipal GetBearerTokenPrincipal(string token, ClaimsPrincipal claimsPrincipal)
      {
          if (string.IsNullOrWhiteSpace(token)) { return claimsPrincipal; }

          var parsedToken = new JwtSecurityTokenHandler().ReadJwtToken(token);
          var scopeClaims = AddScopeClaims(parsedToken);
          return new ClaimsPrincipal(new[] { new ClaimsIdentity(parsedToken.Claims.Concat(scopeClaims)), (ClaimsIdentity)claimsPrincipal.Identity });
      }

      private IEnumerable<Claim> AddScopeClaims(JwtSecurityToken parsedToken)
      {
          var retVal = new List<Claim>();
          var scopeClaims = parsedToken.Claims.Where(c => string.Equals(c.Type, "scp", StringComparison.OrdinalIgnoreCase));
          foreach (var claim in scopeClaims)
          {
              retVal.AddRange(claim.Value.Split(new[] { ' ' }, StringSplitOptions.RemoveEmptyEntries).Select(cv => new Claim(ClaimTypes.Role, cv)));
              retVal.Add(new Claim(ClaimConstants.Scope, claim.Value));
          }

          return retVal;
      }
  }

  public class GraphQLUserContext : Dictionary<string, object>, IProvideClaimsPrincipal
  {
      public GraphQLUserContext(ClaimsPrincipal user)
      {
          User = user;
      }

      public ClaimsPrincipal User { get; }
  }
Now that the user context has been created and injected into the GraphQL pipeline, we can markup our schema with appropriate authorization checks:
Schema\StarWarsSchema.cs - Here, just make sure we're authorized before providing schema data
public class StarWarsSchema : GraphQL.Types.Schema
{
    public StarWarsSchema(IServiceProvider provider)
        : base(provider)
    {
        this.AuthorizeWith(Policies.AuthorizedUser);

        // ... existing stuff
    }
}
Schema\StarWarsQuery.cs - Ensure that readers have the character:read scope
  // ... Added to each 'Field<...>' declaration
  .AuthorizeWith(Policies.CharacterAccess)
Schema\StarWarsMutation.cs - Ensure that writers have the character:write scope
  // ... Added to each 'Field<...>' declaration
  .AuthorizeWith(Policies.CharacterWriteAccess)
With this new class added and authorization enabled within our schema, we can now jump back to Startup.cs and the Configure() method to add a few final touches.
  app.UseAuthentication(); // this was here before...
  app.UseAuthorization();

  app.UseEndpoints(endpoints =>
  {
    // GraphQL (add the 'RequireAuthorization' call)
    endpoints.MapGraphQLWebSockets<StarWarsSchema>().RequireAuthorization();
    endpoints.MapGraphQL<StarWarsSchema>().RequireAuthorization();

    // ... existing stuff
  }
The project should now build and run successfully! Running the application should now display the GraphiQL user interface, interact with Azure AD B2C for user sign-up / sign-in and check against the current authorized user prior to displaying data. For example, you can test the authorization pieces by tweaking the appsettings.json file to remove the character:write scope. Once the app is restarted, if you attempt to createHuman, you'll get an authorization error displayed in the GraphiQL interface, nice!
Of course, everyone is logged in, but right now, everyone also has access to the same data. This may be fine for certain applications, but what happens if we want to restrict the data the user sees based on their credentials?
Isolating User Data
Isolating user data is a common requirement in many applications, in our case, we're going to 'cheat' a little bit by entirely isolating our user data based on the currently logged in user. To do this, we'll make a small change to the Services\StarWarsDataService.cs class to provide that isolation. First, rename the existing StarWarsDataService class to UserStarWarsDataService, then drop the following definition for our new, user isolating, version of the previous service.
  public class StarWarsDataService : IStarWarsDataService
  {
      private readonly IHttpContextAccessor _httpContextAccessor;
      private readonly ConcurrentDictionary<string, UserStarWarsDataService> _userData = new ConcurrentDictionary<string, UserStarWarsDataService>();

      public StarWarsDataService(IHttpContextAccessor httpContextAccessor)
      {
          _httpContextAccessor = httpContextAccessor;
      }

      private UserStarWarsDataService GetUserDataService()
      {
          var userId = _httpContextAccessor.HttpContext.User?.GetNameIdentifierId();
          if (string.IsNullOrWhiteSpace(userId)) { throw new UnauthorizedAccessException("You must be authenticated to proceed"); }

          return _userData.GetOrAdd(userId, (id) => new UserStarWarsDataService());
      }

      public Human AddHuman(Human human)
      {
          return GetUserDataService().AddHuman(human);
      }

      public Task<Droid> GetDroidByIdAsync(string id)
      {
          return GetUserDataService().GetDroidByIdAsync(id);
      }

      public IEnumerable<StarWarsCharacter> GetFriends(StarWarsCharacter character)
      {
          return GetUserDataService().GetFriends(character);
      }

      public Task<Human> GetHumanByIdAsync(string id)
      {
          return GetUserDataService().GetHumanByIdAsync(id);
      }
  }
That's it, now if you sign-up with two different users, you can 'createHuman' as often as you like and the data won't be exposed to other users of the system. Nice!
Wrap Up
In this post, we took our insecure GraphQL API and wired it into Azure AD B2C to provide a user sign-in experience. We then added authorization to ensure that users had the appropriate scopes to read and write character data. Lastly, we dialed things up a notch and isolated a particular user's data from all other users of the system, using the current user context. We now have an API that ensures only authorized users have access, that users have appropriate access for the operations they are trying to perform and that user data is isolated. The code is available here (in the part-3 branch) if you're interested.
Our API is now safe to deploy to the internet, which is just what we'll do in Part 4, see you next time!
- Part 1 - Create the API
- Part 2 - Configuring Azure Active Directory B2C
- Part 3 - Integrating the GraphQL Server API with Azure AD B2C <== You're here!
- Part 4 - Automating Build & Deployment to Azure App Service
- Part 5 - Consuming the Secured GraphQL API from a React App
Until then, happy coding!
Credits
I want to thank my colleagues at Core BTS for all their assistance in the preparation of this post. Their technical expertise and willingness to share that knowledge is truly inspiring. Specifically, I'd like to thank Andrew Petersen for his technical reviews and feedback.